While there are a large number of functions available for use with your Flows, you may sometimes find the need for one a particular function that either doesn’t exist OR may make for a complex process with existing cards. The “Call Code Function” card allows you to create your own JavaScript-based code functions and call them in the form of a special card within your Flow!
Course Material
While there are a large number of functions available for use with your Flows, you may sometimes find the need for one a particular function that either doesn’t exist OR may make for a complex process with existing cards. The “Call Code Function” card allows you to create your own JavaScript-based code functions and call them in the form of a special card within your Flow!
Overview
While there are a large number of functions available for use with your Flows, you may sometimes find the need for one a particular function that either doesn’t exist OR may make for a complex process with existing cards.
The “Call Code Function” card allows you to create your own JavaScript-based code functions and call them in the form of a special card within your Flow!
Before proceeding with this module, please note that this is a Premium feature, so if you don’t see that you have access to this - check your plan before you attempt to use it!
Also, it’s important to make sure that - before using this feature - you should make certain that you absolutely cannot achieve your goals unless you use some custom code. There are a great many cards available, so Call Code should be a last resort.
Overview - Call Code Function Card
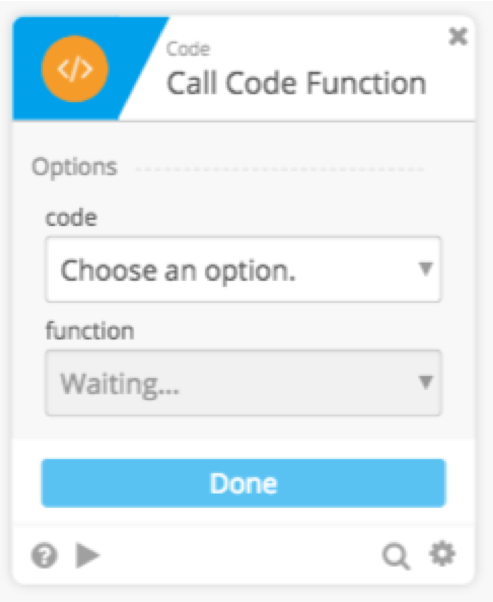
You can find the Call Code Function card in the “Code” category when you click into the functions library inside a Flow.
This card has two options:
- First you choose a custom code brick you have already written
- Then you select a function from within that code brick.
Some code bricks may have multiple functions within them, hence why we give you a easy-to-use list!
Obviously, we can’t use code if we haven’t set it up, so let’s talk about how you set up a code brick in Azuqua using JSDoc. !
JavaScript and JSDoc
Before we go too deep on how to use JavaScript in this instance, you should first have some familiarity with JavaScript itself. If you’re not, make sure you take some time to review the language and learn some of the fundamentals.
JavaScript is easy to learn and incredibly powerful. Having a large community means you can often find code samples that you can modify and use for your Flows.
Great references to learn can be found at sites like:
| Site Name | URL |
|---|---|
| Wikipedia | https://en.wikipedia.org/wiki/JavaScript |
| JSDoc | http://usejsdoc.org/ |
| Mozilla’s JavaScript Guide | https://developer.mozilla.org/en-US/docs/Web/JavaScript/Guide |
| Code Academy | https://www.codecademy.com/learn/introduction-to-javascript?composer_curriculum_redirect=javascript |
Creating Your Code Function
In order to call code, you’ll first need to create that code in Designer.
To do this:
- Click “Settings”
- Click “Code Functions”
- Then click “+Upload Code”
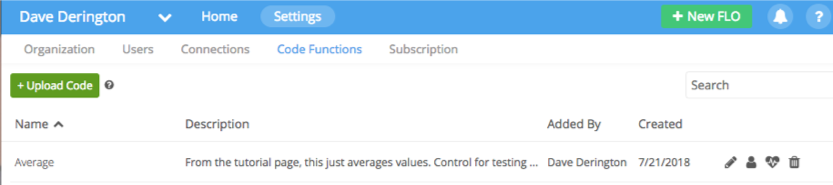
You will then be prompted to Name your code and give it a description.
Again, Best Practice is for you to name your function in a way that makes it easy to recall, and also to give it an appropriate description.
If you have code to upload, you can easily click the Upload Code button. For this demo let’s click “Write Code”

Key Points in Working with the Call Code Function Cards
Examples are detailed in the Workbook, but below are some summarized key points:
Using the Comments Block (JSDoc)
The code function relies on JSDoc to call functions in your code snippet . It’s crucial to expect that some modifications to your code will be required to make sure a Flow can call the code.
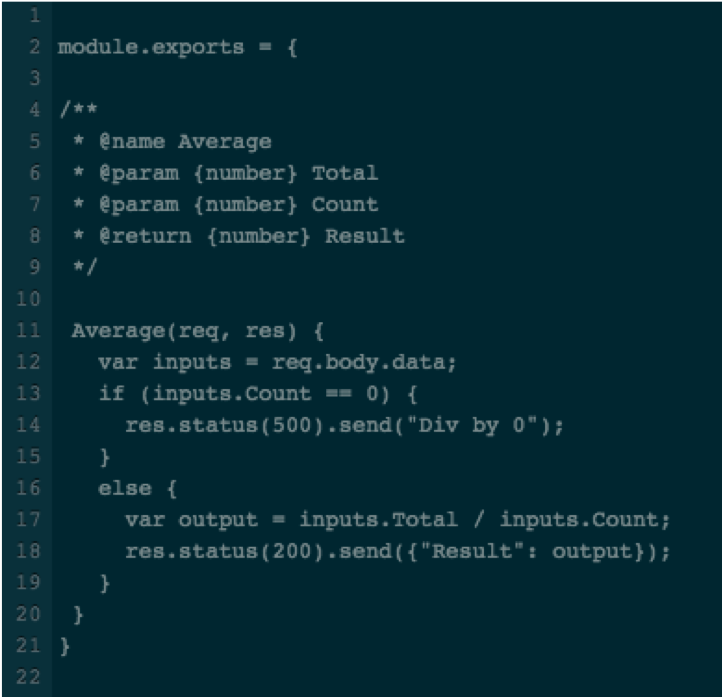
Within the Comment Block:
- The name (via @name)
- Inputs, marked by the @param tag
- Outputs (if there are any) designated by @return
Getting Types Correct
It’s crucial to get the types correct in order for your code to work as expected.
Types can be:
- Number
- String
- Object
- Boolean
- Date
- Or a List
- Lists are designated by adding square brackets after the type, e.g. “{number[]}” for a list of numbers.
Decomposing the (req,res) Section
The (req, res) section is tricky at first pass … let’s decompose this a bit such that it makes sense:
Req = “Request”
This is an object within JavaScript that, once called, will pass in variables.
If you observe the next line, it reads: var inputs = req.body.data;
This assigns the input object (data coming from the Flow that calls this function) to a variable called “inputs”, and we can easily access these variables within the rest of the code. For example: inputs.Count returns the “Count” parameter (or variable).
Res = “Response”
Details aside, when the system runs your JavaScript it will provide responses … errors, for one, are obvious … but the code will also return results as well.
In this code you see two responses:
The “res.status(500).send(“Div by 0”) reflects an error if you’ve tried to divide by zero. We all do it sometimes, so this is good form for Error Handling!
The last line - res.status(200).send - returns a result. Remember JSON? Well you’re in luck! As you’ve seen throughout our platform this will be an JSON object with the result.
Again, tt’s also really important to get your format right. Pay careful attention to braces, semicolons, and parentheses. We also recommend that you try testing your JavaScript code outside of the platform (in other words, somewhere you can run JavaScript natively) just to make sure it’s working correctly.
Summary
Remember that JavaScript, while straightforward, will require some understanding of how to code.
The Call Code Function card also may not be available in all packages, so consult your plan for details.