-
What is Designer
Our application delivers a robust Software-as-a-Service (SaaS) integration platform that empowers product and services teams to standardize the delivery of custom integrations – allowing you to focus on core product features, win new business, and improve client retention.
The workspace on the platform called the ‘Designer’ allows users to create easy to use, visual drag and drop workflows called Flows to automate repetitive tasks. Flows use connectors to the applications you want to connect. Flows usually are triggered by an Event card. For example, when an opportunity in Saleforce is ‘Closed Won’ start a process to create a organization in Zendesk.
-
Concepts
Flow
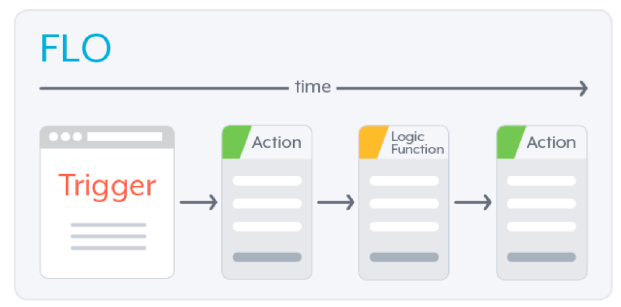
A Flow is a term for “automated workflow”. Represented by a trigger, a series of actions, and logic functions that are executed left-to-right in the designer.
Within Designer, Flows are represented by a Trigger Event followed by a series of Actions and Logic Functions which are executed from left-to-right. Flows vary in complexity. A simple scenario may only contain a few cards, while a more complex scenario can contain dozens of cards depending on the use case requirements.
Designer
It is the User-interface where you can create Flow(s) to automate your processes. Each user gets their own workspace in their account to create Flow(s)
Events
Events allow you to monitor for changes within your cloud applications. When a change has been detected, the Flow will execute. You can initiate your Flows from an application (most common), by schedule, and on-demand.
Although Flows can be scheduled or even run manually, an Event kicks off a Flow based upon something that happens in an app. For example, you may have a Flow with an event that regularly monitors keywords from Tweets via Twitter.
Actions
Actions allow the Flow to tell the cloud application to do something such as pull information from another app. These are steps that usually follow the Event trigger and can be one or more in a Flow. Action Cards are usually used along with function cards to to produce the desired outcome.
Function
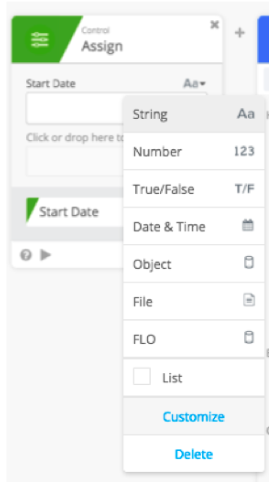
A function sets values or manipulates data within a Flow. There are a wide range of functions: Text, Number, List, Object, True/False, and many more.
Connectors
A Connector is a pre-built framework that leverages a vendor’s API and allows your Flow to access to a specific cloud-based application. On the platform there are over 250+ connectors including ones for Salesforce, Smartsheet, Workfront, and more.
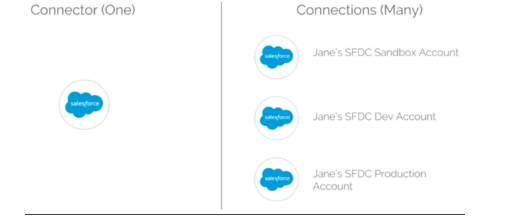
Connection
A connection is an instance of a connector. For example, your Salesforce account authenticated on the platform is a connection of the SFDC connector.
-
Connecting Apps
Setting up application connections is important step in building your Flows. Connections can be established and checked in the Settings section.
- Go to Settings >> Connections
- Select your connector (i.e. Gmail, Slack, Trello)
- +New Connection
- Authorize the channel (i.e. entering in the required details as requested, usually is username & password but some connections require Instance URL etc. Most of these details can be found in your account for that application)
- To ensure that your connections are setup, you should see a small green check mark adjacent to the App if everything is configured correctly
- You can connect as many accounts and instances of the same connector as needed. For example, you might need to connect both sandbox as well as production instance of Salesforce and can use the required connection in the Flow.
-
Building Flows
Once you have the connections ready you can get started on building the Flows you need. Before you start it is always good to have an idea of what you want to the Flow to accomplish. You can use these pointers to help you design great Flows:
- What am I trying to accomplish?
- How/When do I want to run this Flow?
- What data do you need coming in and what data do you need coming out?
- What fields do I need?
- What transformations/manipulations must I make?
- What does success look like?
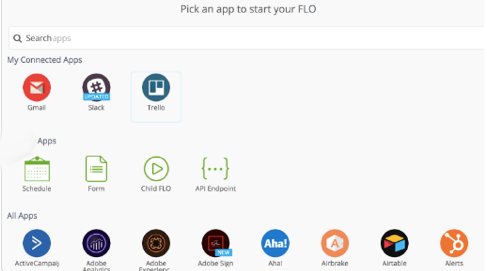
Each Flow usually starts with an Event Trigger and followed by Action and Function. To build a new Flow start by clicking on green icon that says +New Flow

Once selected, you’ll be directed to this screen where you’ll see all your connected apps, and all applications
Click on the connector you want to use and you will be prompted to choose from a set of Event or Action Triggers to start the Flow. Most Flows will usually need an Event Trigger to start i.e When a Lead in Salesforce moves to Closed Won Status. This event can start a series of Actions to get your desired outcome. Let’s look at what are Events and Actions are.
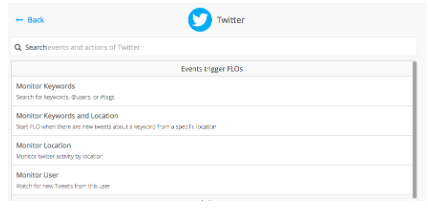
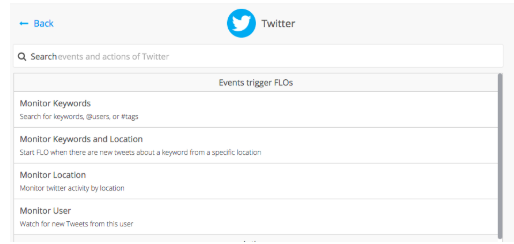
Events
An event is a trigger that starts your Flow. Typically, these triggers are set up to listen for something that happens within an app. Each connector can have both events and actions. As an example below are some of the Events in Twitter that can trigger a Flow to start.
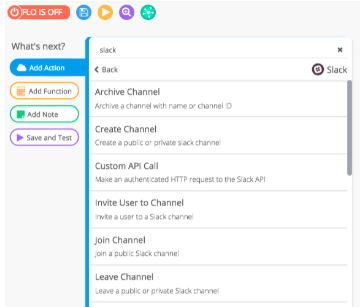
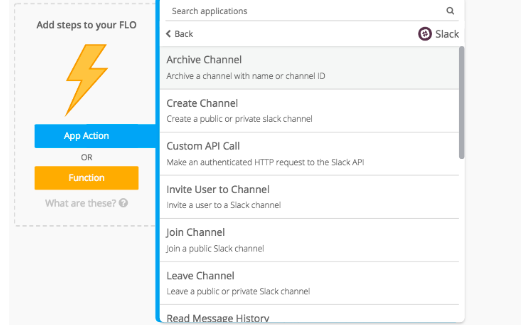
Actions
An action occurs after an event and represents the things you can do with a connector. In other words, these are verbs. Actions can range from sending a message to copying data and working with spreadsheets. Each application can have multiple actions as you can see here Slack has over ten different actions.
You can have a basic Flow ready with an event trigger and an action. Below is an example of a Slack message anytime someone mentions your company on Twitter. The Event Card is ‘Monitor Keywords’ in Twitter which gets triggered when your company is mentioned on Twitter and it then sends that content to a Slack channel.
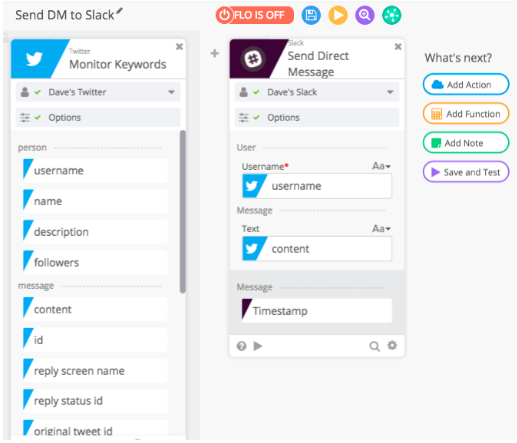
Now that was a pretty Basic Flow with two cards, what if we want to add text to the Slack message. This is where you can use the Function library to transform the data to how you want. So what are Functions?
Functions
Functions are where Flows really shine. Once you know how and when to use functions, you’ll be able to make pretty much anything. Rather than connecting to specific outside applications like actions, functions are cards that handle and transform data inside of of a Flow. The functions menu is split into categories like Text functions, List functions, Object functions, and more.
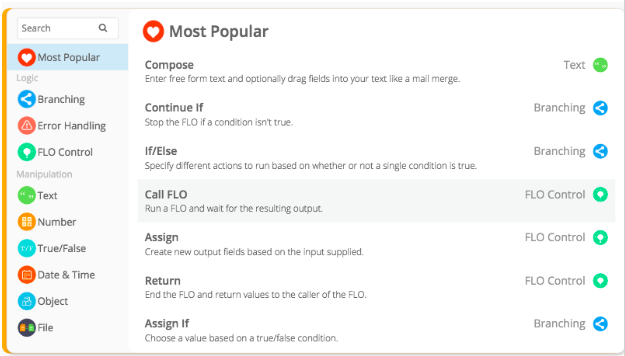
As you can see there are different kinds of functions and all of these help make the Flows powerful.
Some of the commonly used Function types are:
- Branching
- Flow Control
- Lists
- Object
Data Types
Different applications support different data types and sometimes you might need to use a list of strings in the Flow or numbers from a particular field. The following data types are supported which covers most of the data types used.
- Files
- True/False
- Text
- Objects
- Number
- Date & Time
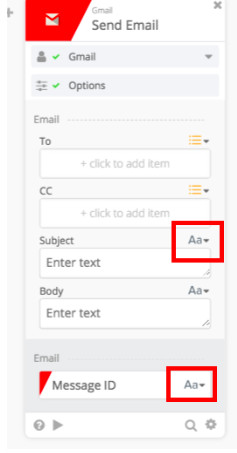
All Input and Output card fields will expect a certain data type. You can check what the data type is by hovering over the field. The example below we can see that subject in the Gmail Connector expects a string as an input and the message ID that comes as an output is also a string.
Some key tips:
- The type of input/output dictates what type of output/input it can be associated with.
- There built in rules that will let you know if your types don’t match up.
- Make sure all of the types match up and then you can save your Flow.
Mapping
In a Flow data from one Event / Action Card is transformed in another Action / Function card. It is important that the data is mapped correctly. In Designer this is done by the ‘Drag & Drop’ method. Click and Drag an output to the appropriate input. You can use mapped outputs to map to new inputs on different actions or functions.
-
Running Flows
Once you have created and saved the Flow you will need to test it to see if it is actually doing what you want it to do. Once you save the Flow you can use the ‘Test’ Button to test Flow.

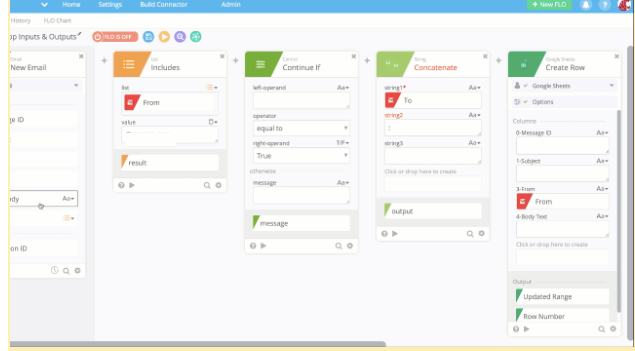
Below is an example how a saved Flow looks:
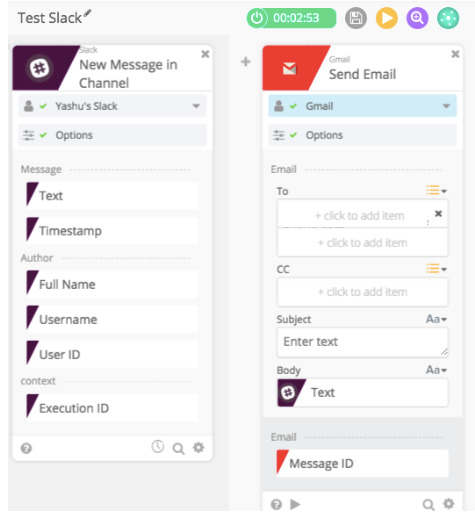
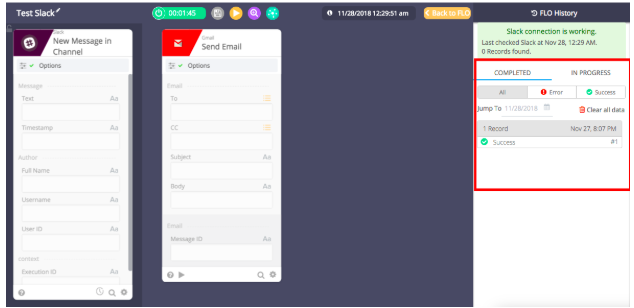
You can test the entire Flow by clicking on the test button and it will open a new screen that looks like this
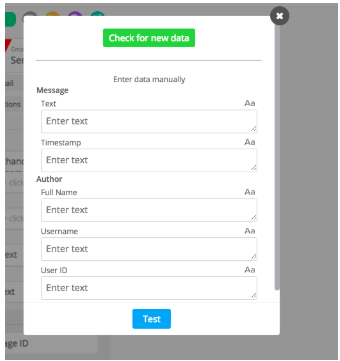
There are two things you can do. You can test in the application with some test data to trigger the Flow and press the ‘Check for new data’ button. You might need to wait for a minute or two to see new data come through or actually input data into the fields in this test window.
You can see if the test was successful by clicking on ‘Flow History’ Tab. On the right hand corner you will be able to see all the times the Flow has run. Click on the test attempt( the latest execution) and you will be able to see how the Flow ran including the inputs and outputs.
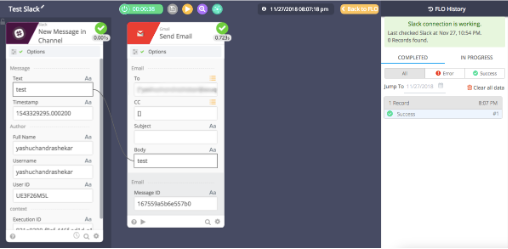
In the above example you can see how the text from Slack is inputted into the Gmail card and the data is transferred from Slack to Gmail.
In a Flow this small it is easy to test the whole Flow however sometimes you will have a large Flow with multiple branches and complex logic. You can then test individual cards to see the flow of the Flow.
Testing Individual Cards
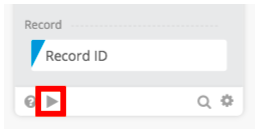
Testing individual cards gives you visibility into - The format of the card’s outputs - What kind of data you can expect to get back in a field - Allows you to test inputs to your card Each card had a test button at the bottom left corner.
Each card will have different inputs and outputs, but what is nice is that this window will only display the inputs you have selected for the card!
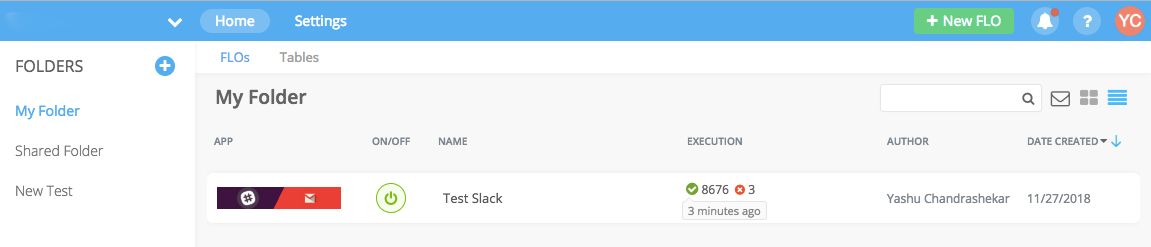
Turning Flow ON/ OFF
In Designer you can turn the Flows you create on/off. According to the plan you are on there is a maximum number Flows you can have switched on at the same time. The designer will give you an overview of all your Flows and you can quickly turn Flows on/off.

Flow History
Flow History is important when you are debugging an execution error or want to know how many times a Flow ran successfully. Clicking on the ‘Flow History’ Tab in the Flow will let you view all the executions of the Flow.
You can also see how many executions have been completed as well the ones in progress. Both successful and unsuccessful executions can be viewed by clicking on a particular execution. You can see the Flow of all the inputs from start to end (or where it stopped).
Folders
You can use folders to differentiate the Flows you create. Folders will help keep the Flows organized. On the left hand side of the screen you will see the tabs for ‘My Folder’, ‘Shared Folder’, and more. This is where you can access various folders that you as an organization create. There are no limits to the number of folders the account can have as well as the number of Flows in each folder.
‘My Folder’ is the first folder on the list is the only folder that cannot be shared with other members in the organization. You can however export and import Flows into this folder.
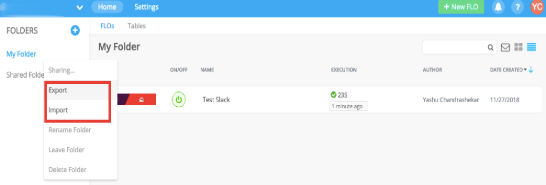
You can create a new Folder by clicking on ‘+’ button next to Folders. You can name the new folder with any name of your choice.
All new folders that you create can be shared with other users in the organization by clicking on the ‘Sharing’ button. You can grant full or partial access to users as seen below
-
Troubleshooting
Best Practices
While working in Designer (the Flow- building interface) following some of these Best Practices will help keep your Flows organized.
Flow Naming Conventions
Having a naming convention for all your Flows & Child Flows will help track Flows easily and make sense of their order.
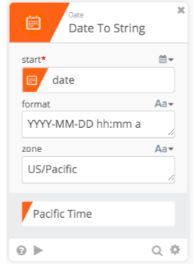
Naming Fields and Outputs
Each field within a Card may be renamed. Clicking the Type icon adjacent to the field name, then clicking “Customize” will grant you access to customize your field.
Naming Outputs
Similar to this you may customize / change names of Output fields. This is particularly helpful in making sure you leverage the correct field.
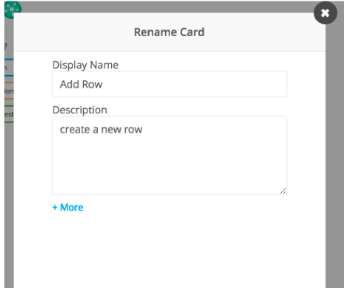
Naming Cards
You can also name Cards similar to how you would a field. Click the gear icon at the bottom right of the card - Select the “Edit Card” option - You’ll be given the option to rename the card and even add a description!
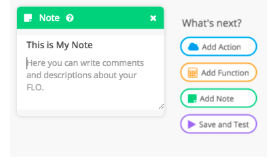
Notes
Adding a Notes card does not contribute to run-time processing and can provide for a simple way to add quick notes about a Flow.
You can use Notes for many things such as:
- A reminder (for you and others) of what is happening in Flow
- To-Do Reminders: You can document progress on incomplete Flows so you can pick up where you left off
- For example, you can “change the folder ID before moving this from sandbox -> production”
-
Teams and Collaboration
Depending on your subscription you may have one or more users in your organization. In case of multiple users you are one of the three types on users on the platform:
Member
This is the primary level of permission a user can have. Members have their own “My Flows” folder where they can create Flows of their own and add connections to applications. By default, nobody else – not even administrators – can view Flows or access connections created by a member unless that member chooses to share them using the Shared Flows folder, a new folder that is shared, or changing connection permissions. Any member can see the full list of other members and their roles, but cannot invite additional members into the organization.
Administrator
An administrator has all of the permissions of Member plus they can invite additional members into the organization. They cannot view or access any Flows or connections that have not been shared with them.
Primary Administrator
A primary administrator is just like an administrator except they cannot be downgraded to a lesser role and they are the only user able to upgrade or change subscription settings, or name a different user to be the new primary administrator. Contact support if you need to make a change to the primary administrator for a single user organization.
Collaboration
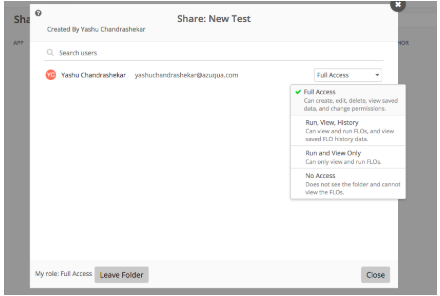
All custom folders you create start out as private. When a custom folder is selected, you’ll see a “Sharing” button above the list of Flows. Click it to decide who to share your folder with and how. There are 4 roles a person may have for a custom folder:
- No Access: Does not see the folder and cannot run or view the Flows.
- Run and View Only: Can view and run all Flows but cannot create or edit Flows or view Flow execution data.
- Run, View, History: Similar to “Run and View Only” but can also view Flow execution data. This is useful when you want to give a user permission to audit or debug Flow results while still protecting the Flow from unwanted edits.
- Full Access: Has full permission for the folder and all of its Flows. Can create, edit, delete, view execution data, and change folder permissions. A user’s role determines their permissions for the Flows currently contained in the folder as well as Flows that are added later.
Sharing Connections to Applications
Flows typically contain events or actions that connect to one or more applications that require connections. Just as Flows can be shared, connections to applications can also be shared. There are three roles a person may have for a connection:
- Can Run
- Run or edit a Flow that uses this connection, but only if it the Flow been shared.
- Cannot access or modify the connection options or add new events or actions using this connection.
- Can Use
- Add new events and actions using this connection.
- Can Edit
- Full permission for the connection. Can modify, change permissions for, or delete this connection.
All new connections are “Can Run” for all other users by default so that Flows will just work when shared. If you don’t want anybody to access the connection, don’t share any Flows that use the connection. If you want to restrict access, share only in folders where you are the only one set to Can Edit for the folder.
To allow others to use the connection for new actions and in new Flows, add them as “Can Use” and it will show up in their connection list, but they still won’t be able to modify the connection. To share the connection with full permission, you can assign additional individuals to “Can Edit” or, for shared company connections, you can set all users to have full permission.
To change how a connection you created is shared, click on the gear icon that appears to the right of the connection name and choose “edit permissions”. You’ll find your connections for a specific application on the first tab of any event or action card that connects to that application. Or, to find a full list of the connection you can edit or use, click the gear icon at the top-left of the Home screen (just below the company icon) and choose the Connections heading along the top.