It’s highly suggested that you run through part 1 of this walkthrough, to get there, click here.
For the full connector JSON we’ll be building in this walkthrough, click here.
Getting Started
In our last connector building walkthrough, we started building a connector that integrated with a Game of Thrones API, an API of Ice and Fire by Joaquim Skoog. In that previous walkthrough we went over:
- Building a basic connector method’s UI
- Creating actual functionality in your connector method, including module basics and more
- Testing connector methods
- Saving, submitting and deploying a connector
Specifically, we went through a tutorial about how to build a method in our connector that takes in a character ID and returns information about that character.
This time, we’ll be building off of the connector we built earlier and adding integration with another route from the API of Ice and Fire. We’ll now add these skills to our arsenal of connector building techniques:
- Returning a collection from a card
- Mapping over a list, to return a collection in the format we’d like
- Using helper functions in a connector
- Using “variant”
This route allows you to look up a Game of Thrones house, and get back some useful information, including a list of URLs for all characters in that house. We’ll then process each one of those URLs, and return a collection of characters that belong to that house. We’ll call it “Get Characters in House”.
Just like before, we’ll start by designing the way users will interact with this connector while building Flows. And again, like before, note that the below screenshots were made before An Api of Ice and Fire moved to HTTPS, thus the screenshots still have urls starting with http instead of https. Make sure you use https when building your Connector!
For this specific route, we’ll only need to take in the house ID. Then, we’ll return a collection of characters, with each character providing the following information:
- Name
- Culture
- Aliases
- Played By
The card we’ll be aiming for will look like this in a Flow:

Now that we know what we’re aiming for, let’s start building this connector.
UI
If you’ve gone through the previous walkthrough, defining your inputs should feel fairly familiar at this point. Let’s give it the heading “House Info” and name the field we’re asking users to input “House ID”.
You should end up with something like this:
{
    "extensible": false,
    "attributes": [
        {
            "name": "House Info",
            "attributes": [
                {
                    "name": "House ID",
                    "type": "string"
                }
            ]
        }
    ]
}
Now, making our outputs will be a little different this time around. The foundational concepts will still be the same, but this time we’ll be returning a collection of objects in our card.
In general, collections inside this platform are represented in the following way:
Heading----
      Collection Name
           - Field inside Individual Item
In our case, it will be:
Characters In House-----
      Characters
           - Name
           - Etc.
So, first, let’s apply the knowledge we learned from last time and fill in our heading, and a single object field inside of that called “Characters”. “Characters” should also contain the fields “Name”, “Culture”, “Aliases” and “Played By”. Remember to assign the type “object” when defining an object with fields inside of it.
We’ll end up with this:
{
    "extensible": false,
    "attributes": [
        {
            "name": "Characters In House",
            "attributes": [
                {
                    "name": "Characters",
                    "type": "object",
                    "attributes": [
                        {
                            "name": "Name",
                            "type": "string"
                        },
                        {
                            "name": "Culture",
                            "type": "string"
                        },
                        {
                            "name": "Aliases",
                            "type": "string",
                            "collection": true
                        },
                        {
                            "name": "Played By",
                            "type": "string"
                        }
                    ]
                }
            ]
        }
    ]
}
Turning this into a collection is actually very simple. All we need to do is add a “collection” field to the “Characters” object and set it to true, like so:
{
   "name": "Characters",
   "type" : "object",
   "collection" : true,
   "attributes" : [{...}]
}
We’re now done defining our UI! Now onto the functionality.
Core
NOTE: If, while building this method, you come across this error while saving:
{
   "message": "action method must return an object",
   "type": "INVALID_CLOSE_TYPE",
   "channelMethod": "myMethodNameHere",
   "parent": []
}
This means that your Action method needs to have its last output be a single object, as the engine needs to know how to tie the data to our current UI framework. So, if the last module in your method has more than one output (like most HTTP bricks) or has an output that is a collection, you will see this error pop-up. To fix it, just add in a module that ends with a single, non-collection output (like Object.Construct).
In this method, we’re going to have to perform a couple of steps.
- Grab the house information with the given house ID
- Grab the “swornMembers” list of URLs from the above response, and for each item in that list: A. Grab the character information from the URL B. Format the information into a way that matches the expected UI structure for each item in our list
- Then, format the final output to include the now-formatted list
At the end of it all, we’ll want to be outputting information like this:
{
    "Characters In House": {
        "Characters": [
            {
                "Name": "Daenerys Targaryen",
                "Culture": "Valyrian",
                "Aliases": [
                    "Dany",
                    "Daenerys Stormborn",
                    "The Unburnt",
                    "Mother of Dragons",
                    "Mother",
                    "Mhysa",
                    "The Silver Queen",
                    "Silver Lady",
                    "Dragonmother",
                    "The Dragon Queen",
                    "The Mad King's daughter"
                ],
                "Played By": "Emilia Clarke"
            }
        ]
    }
}
To actually accomplish this, we need to get our modules set up. In case you need a refresher on modules, check out part 1 of this walkthrough, or check out this documentation on modules.
The first module we’ll want to set up is an HTTP.Get module, that will make a request to the “/houses” route. This should feel familiar to the work we did in part 1, so if we just jump right to what this module will end up looking like, we should end up with:
{
    "brick": "http.get",
    "id": "GET HOUSE",
    "inputs": {
        "url": {
            "_availableTypes": [
                "string"
            ],
            "_type": "string",
            "_array": false,
            "_value": "http://anapioficeandfire.com/api/houses/{{input.House Info.House ID}}"
        }
    },
    "outputs": {
        "statusCode": {
            "_type": "number",
            "_array": false
        },
        "body": {
            "_type": "object",
            "_array": false
        }
    }
}
After this, we will need perform some operations on the list of URLs coming back from the API’s response. After that we’ll return that modified list to our final output. The best module for this is List.Map. This module takes in a list, performs a process on each item in that list, and replaces the original item in that list with the processed item. For more information about this module and examples, check out the documentation for this specific module here.
Select List.Map from the module menu, and this brick will be generated for you:
{
    "brick": "list.map",
    "id": "PROCESS ITEM",
    "item": "",
    "inputs": {
        "list": {
            "_availableTypes": [
                "*"
            ],
            "_type": "object",
            "_array": true,
            "_value": ""
        },
        "flo": {
            "_type": "flo",
            "_array": false,
            "_value": ""
        },
        "concurrency": {
            "_type": "number",
            "_array": false,
            "_value": 1
        }
    },
    "outputs": {
        "new list": {
            "_type": "object",
            "_array": true
        }
    }
}
Just like with the HTTP.Get module, each item in the “inputs” object in this module represents a way we can impact how this mapping operation runs. Let’s fill in these values:
- “list” - this is the list we want to iterate over. As you can see, the default is a list of objects, but we’re actually going to be iterating over a list of URLs- which are strings. Make sure to change the “_type” field on this input to “string”. To set the value, use a Mustache reference on the “swornMembers” list from our HTTP.Get, like so: “{{httpModuleIDHere.body.swornMembers}}”.
- “concurrency” - The number of items I would like to process at once. For our purposes, “1” is fine for now.
This leaves “flo”. This input is the function, or sub-Flow, that we will use on every item in our list. The output of this Flow will replace the item it operated on. For example, if my original list was a collection of strings, and my sub-Flow returns an object, I will end up with a list of objects as my final output of this List.Map module.
To set this value, we’ll first need to create a function/sub-Flow to run against. Click on the “Functions” item on the left menu. Click “Add Method”, just like when we were adding an Action before. Go ahead and name this function- I will be naming mine “Get Character For List”, since we will be grabbing specifics about each character hosted at a URL from our original list of URLs.
Let’s fill in the “flo” input in our List.Map, now that we have a method to put in there. Note, when you create a function, you will be creating it with a display name. However, this name is not the “identifying name”, which we will need to use to set our “flo” input value. The identifying name will be the camel-cased, condensed name of your function. So, in this case, the identifying name would be “getCharacterForList”, and that’s what I would put as the “_value” for the “flo” input in this List.Map.
Now, we have our List.Map filled out. It should look like this:
{
    "brick": "list.map",
    "id": "PROCESS ITEM",
    "item": "",
    "inputs": {
        "list": {
            "_availableTypes": [
                "*"
            ],
            "_type": "string",
            "_array": true,
            "_value": "{{GET HOUSE.body.swornMembers}}"
        },
        "flo": {
            "_type": "flo",
            "_array": false,
            "_value": "getCharacterForList"
        },
        "concurrency": {
            "_type": "number",
            "_array": false,
            "_value": 1
        }
    },
    "outputs": {
        "new list": {
            "_type": "object",
            "_array": true
        }
    }
}
Now, we need to actually build out our helper function. This function will need to access the item in the list we’re processing, grab the character information from that URL, and then output that new information.
To access the individual item in the list we’re processing, we will need to add a “variant” flag to our helper method to signal to the engine that this helper function is intended to process a list. “Variant” flags live at the top level of a helper method and are set by clicking the name of your helper method, and then adding this right above “zebricks”:
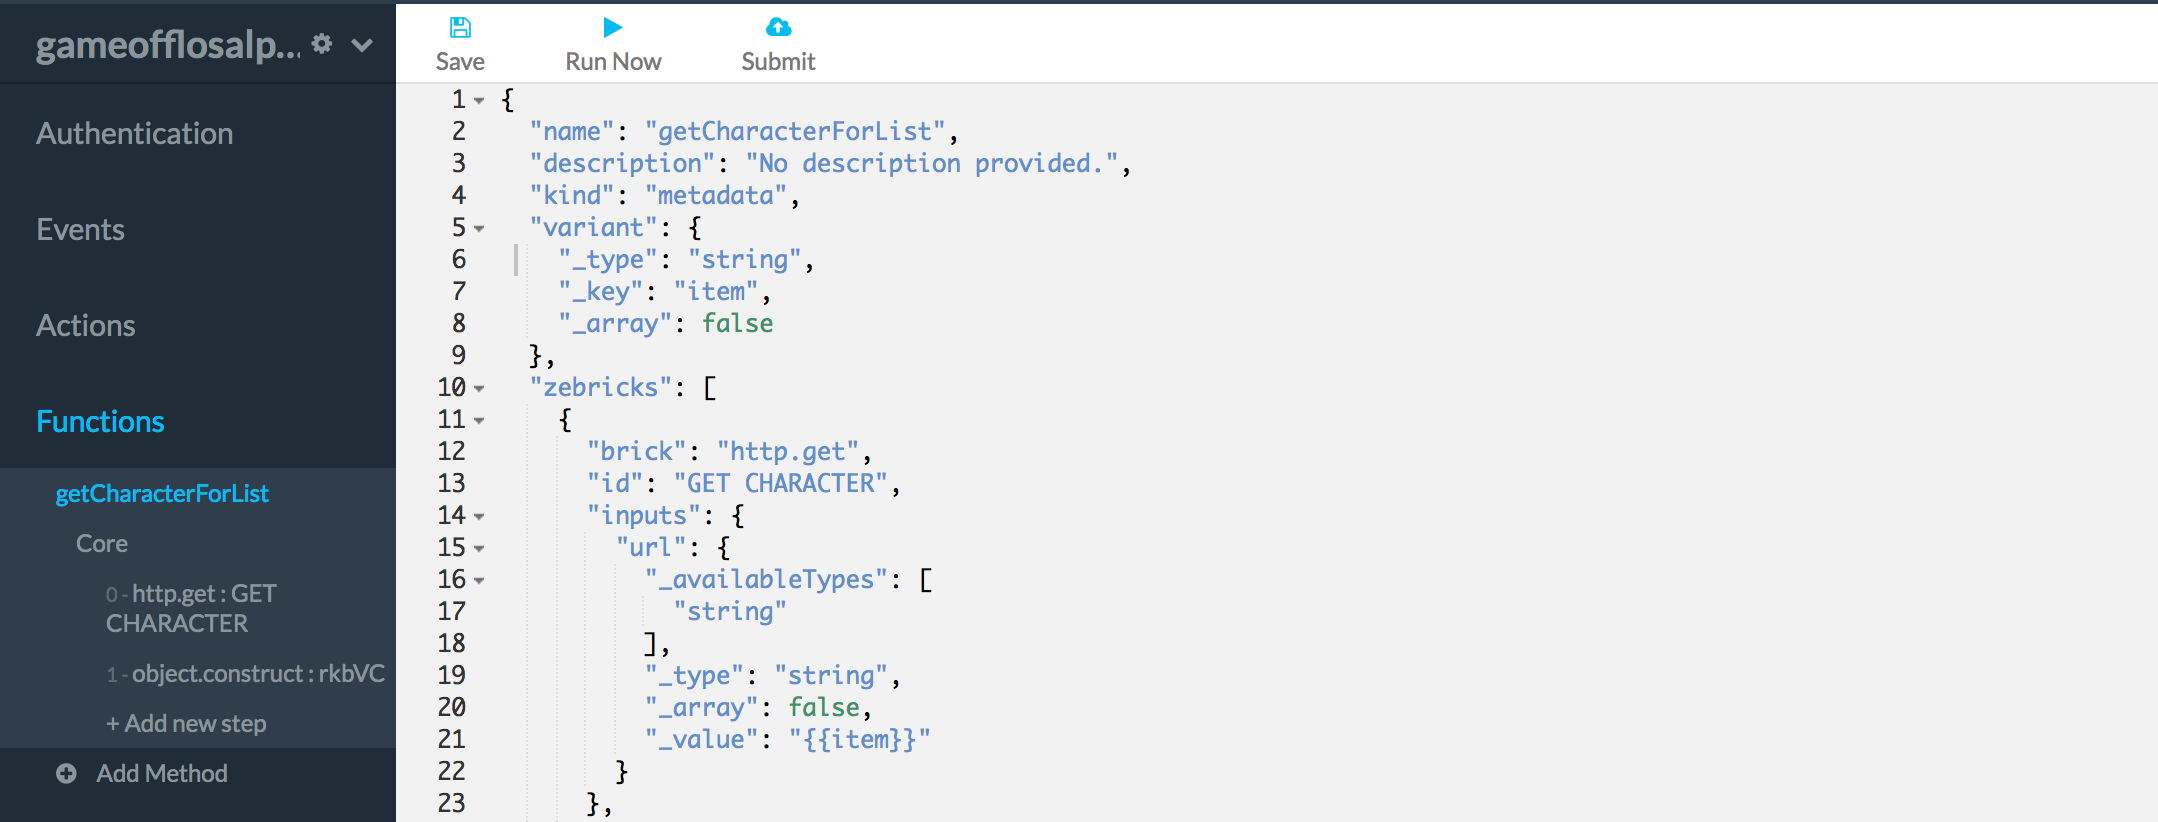
For more information about how to use this, check out this article.
Now, we can refer to each individual item in our list by using “{{item}}” throughout this helper function.
So, in our helper function, we can now refer to the individual item, but now we need to create its actual functionality. First, we’ll want to add an HTTP.Get module so we can call the URL we have from our list. Inside of that HTTP.Get module, we’ll want to fill in the “url” value with “{{item}}”, since each item in our parent list is an actual URL.
That will give us this:
{
    "brick": "http.get",
    "id": "GET CHARACTER",
    "inputs": {
        "url": {
            "_availableTypes": [
                "string"
            ],
            "_type": "string",
            "_array": false,
            "_value": "{{item}}"
        }
    },
    "outputs": {
        "statusCode": {
            "_type": "number",
            "_array": false
        },
        "body": {
            "_type": "object",
            "_array": false
        }
    }
}
Finally, we need to shape this data to match our desired output for each item in our list. This means that it needs to be shaped like this:
{
    "Name": "Daenerys Targaryen",
    "Culture": "Valyrian",
    "Aliases": [
        "Dany",
        "Daenerys Stormborn",
        "The Unburnt",
        "Mother of Dragons",
        "Mother",
        "Mhysa",
        "The Silver Queen",
        "Silver Lady",
        "Dragonmother",
        "The Dragon Queen",
        "The Mad King's daughter"
    ],
    "Played By": "Emilia Clarke"
}
So, just like in part 1, our Object.Construct will need to look like this:
{
    "brick": "object.construct",
    "id": "rkbVC",
    "inputs": {
        "Name": "{{GET CHARACTER.body.name}}",
        "Culture": "{{GET CHARACTER.body.culture}}",
        "Aliases": "{{GET CHARACTER.body.aliases}}",
        "Played By": "{{GET CHARACTER.body.playedBy.0}}"
    },
    "outputs": {
        "output": {
            "_type": "object",
            "_array": false
        }
    }
}
Our helper function is now done! Let’s add the finishing touches to our “parent method” (Get Characters In House). All we need to do now is map this data into our UI’s format. This means adding one last Object.Construct underneath our List.Map module. The structure of the object we’re creating is going to be familiar, except this time we’ve already formatted the entire collection. This means that we fill in the heading and “Characters” field just like before, but we use a Mustache reference for the “Characters” value. If we named our List.Map module “PROCESS ITEM”, we would end up with this:
{
   "brick": "object.construct",
   "id": "FORMAT",
   "inputs": {
       "Characters In House": {
          "Characters": "{{PROCESS ITEM.new list}}"
       }
    },
    "outputs": {
        "output": {
            "_type": "object",
            "_array": false
        }
    }
}
And ta-da! We’re done. List.Map is a crucial piece of working with connectors, and once you’ve understood one way to use it, the rest will come easily. Nicely done!