This workbook is designed to accompany section 301 - Tables.
Pre-Requisites
For this workbook, you should have your own environment with login credentials.
If you are using a Production environment, please take care with any existing processes.
You may also elect to use 30-day free Trial Org by visiting: https://azuqua.com/sign-up
Because this is an Integration product, we will encourage you to use freely-available applications within this material. Tools such as Twitter, Slack, and others are great products and typically allow you to sign-up for free!
Scenario Overview
Imagine that we’re working to onboard new customers and want to monitor their progress with training on our application! We have a 3rd Party Learning Management System (LMS) with training data, but all of our customer information is in Salesforce.
We’ll demonstrate a few capabilities:
- Lookups
- Aggregation
- Reporting
- CSV Import and Export
Exercise 301-1 - Creating and Editing a Table
Let’s begin by creating a new table by clicking on the “New Table” button at the top-right of the interface.
- Give your table a name such as “Contacts” (default is “Unnamed”)
- Click “+New Column” for each column you want to add
- You can select “create and add new” to speed up column creation
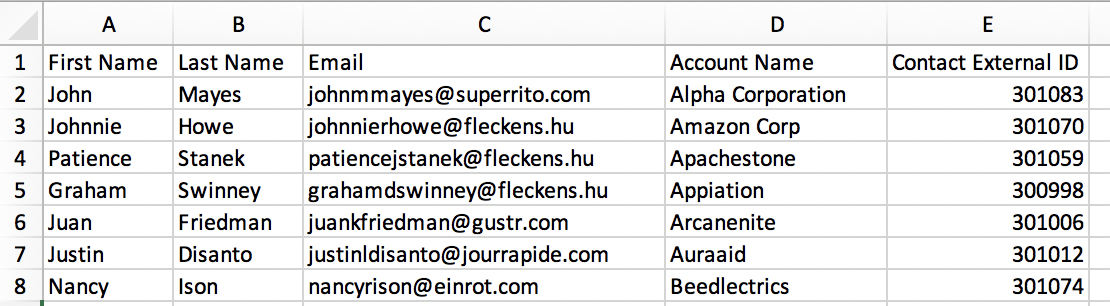
Add the following columns:
- Last Name (String)
- First Name (String)
- Email (String)
- Account Name (String)
- External ID (String)
- Average Score (Number)
- Status (String)
Finally what we want to do is bring in all this data via an Import …
- Select the “Import” icon
- Download this CSV File: Contacts
- Select the file
- Click the “Choose CSV file” link to upload
- Once upload has completed, Check that all the records have been imported correctly
This is a simple, on-time load of contacts. Generally you’d have this process done automatically.
Exercise 301-2 - Populate a Table from a Flows
With your “contact” information in-place, let’s use a second CSV file that contains data from an Learning Management System (LMS) and use this to calculate average scores and update the contacts table.
For this demo, we’ll use a Google Sheet that will represent (or emulate) our LMS data source.
Download the following CSV File: Scores from LMS
This is a simple file with records from users that have taken courses and exams that follow. In this scenario, an on-boarding team would offer training to customers and would want to know if anyone is struggling so they could reach out to help!
Let’s take a look at the file. It contains an “External ID” field which we’ve seen in the table we just created! This allows us to Lookup or Join data between different sources.
Create Your Google Sheet
(As noted above) This will emulate our Learning Management System as a source of data
- Create a new Google Sheet
- Name it “Scores”
- Add the following headers:
- External_ID__c
- Test 1
- Test 2
- Test 3
Create a Flow
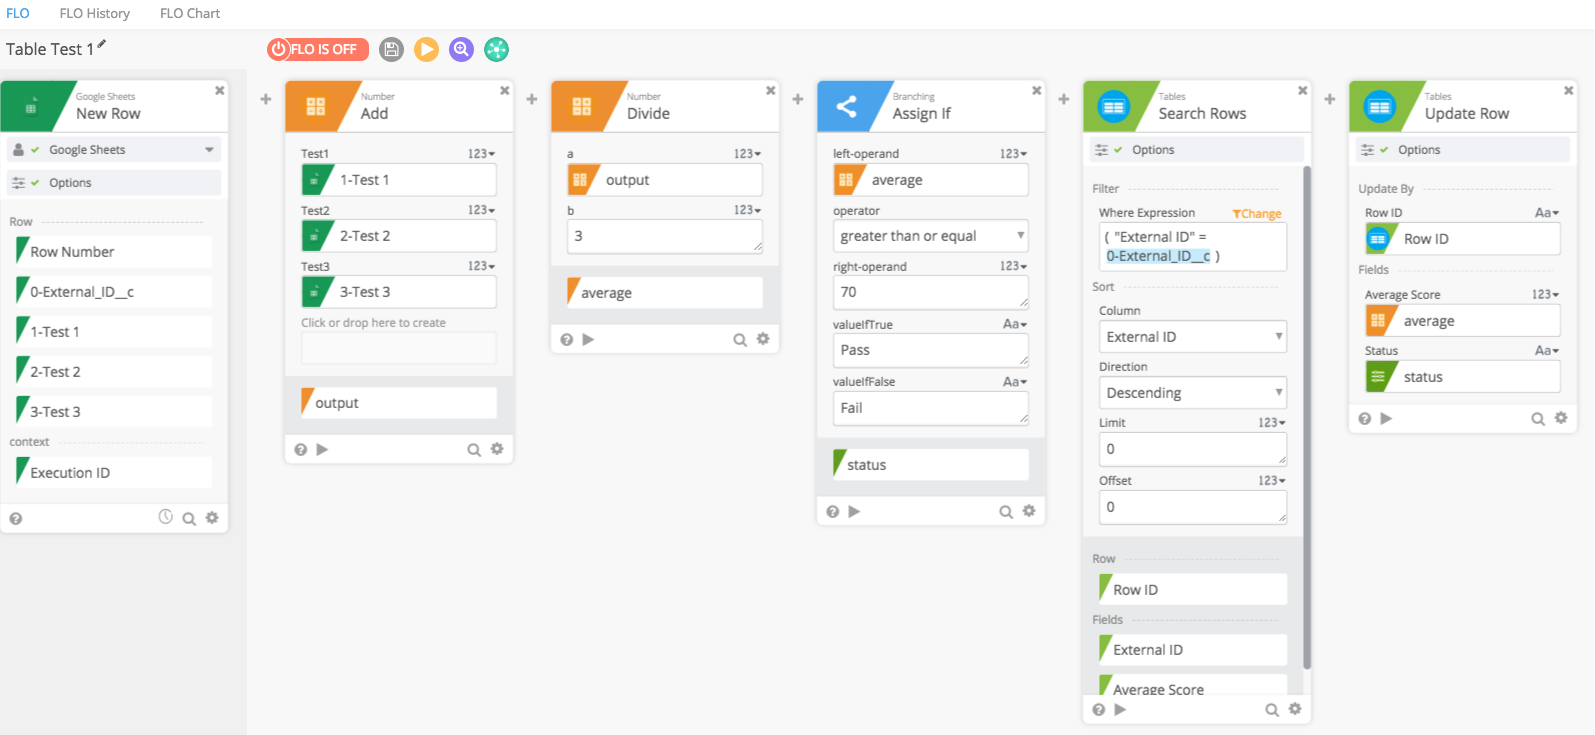
Now we’ll create new Flow to look at any new records in the Google Sheet, average the scores, and update the table!
- Create new Flow to look at any new records in the Google Sheet, average the scores, and update the table!
- Event - Google Sheets - New Row
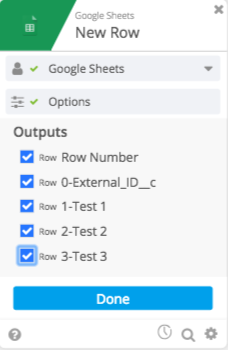
- For Options, select your new Sheet and the current tab and click “Done”
- Select all fields and click “Done”
- Math Add
- Include three fields …
- Test 1, 2, and 3
- Math Divide
- Select the output from the “Add” card and divide by 3
- Assign If
- Average >= 70
- This is the Pass/Fail metric. If someone gets a low score we want to flag this for follow-up
- Tables - Search Row
- Options:
- Select your Contacts table
- Result Set: First Matching Row
- Query: External ID (from Table) = 0-External_IDc) <== Here you’ll drag the “External_IDc” field over
- Matches the IDs
- NOTE: This is a “happy path” example, so there’ll be only one match
- Tables - Update Row
- Options: Select your Contacts table
- Take the Row ID from the Search Rows function
- Update the Average Score and Status
The resultant Flow should look similar to this:
Run the Flow!
Now let’s run the Flow. But first, we need to have data!
Save your Flow and run it once. - Note: Here we’re making sure that no records are returned so that when we copy/paste records they’ll be picked up by our Flow!
- Open the CSV file: “Scores.csv”
- Copy all the records (except for headers)
- Paste them into your Google Sheet
- Wait a few moments - this will give the system time to register new records
Run your Flow! Go back to inspect your original Contacts table and check to see that all the records have been updated as you would expect. You should expect 75 updates to match exactly the number of contacts in the original table.
NOTE: This is just an example / you may have a different experience with your own Flows.