This workbook is designed to accompany section 209 - Child Flows.
Pre-Requisites
For this workbook, you should have your own environment with login credentials.
If you are using a Production environment, please take care with any existing processes.
You may also elect to use 30-day free Trial Org by visiting: https://azuqua.com/sign-up
Because this is an Integration product, we will encourage you to use freely-available applications within this material. Tools such as Twitter, Slack, and others are great products and typically allow you to sign-up for free!
Exercise 209-1 - A Basic Child Flow
Let’s do an easy example of a Function or Subroutine (a Helper Flow, in other words) …
Perhaps we are doing a Marketing campaign and want to reach only our Twitter followers in a particular location or area and are active.
NOTE: This Flow won’t be fully complete … we’re just demonstrating how to call a Child Flow.
To create this Child Flow:
- Create a New Flow
- Name the Flow: “209- 1 - Twitter - Location Match Child Flow”
- Select “Child Flow” as your Event
- Add “Username” and “Location” as the input fields
- Select the Twitter >> Get User Profile Card
- Add an If/Else card
- Conditions: Location = Location
- If true, return location_match = True (True/False)
- If false, return location_match = False (True/False)
- Save the Card
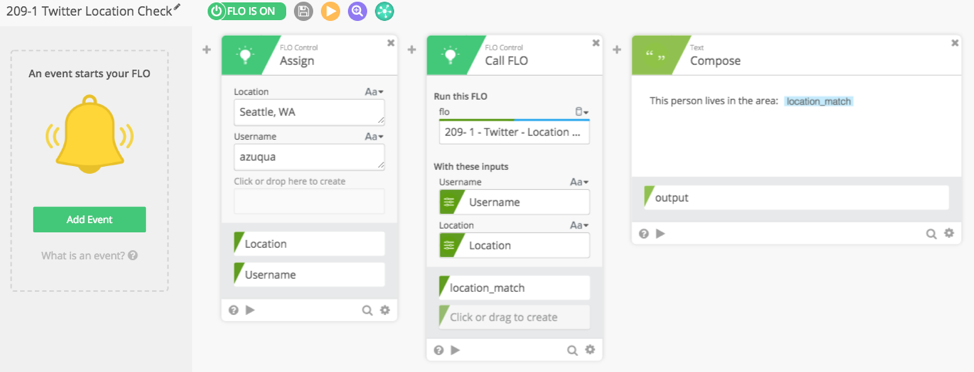
Create a new Flow which calls the Child Flow:
- Create a New Flow
- Name the Flow: “209- 1 - Twitter Location Check”
- Add an Assign Card
- Field: Location
- Value = “Seattle, WA”
- Field: Username
- Value = “azuqua”
- Add a “Call Flow” card
- Select the Flow: “209- 1 - Twitter - Location Match Child Flow”
- Drag the Username and Location fields to the appropriate fields that appear
While this is a rather basic Child Flow, it shows how we can pass information back and forth easily!
Exercise 209-2 - Looping (the “For Each” Card)
Most Flowgrammers quickly learn the need for operations which “loop”. Let’s take an example of this …
Perhaps I have a list of contacts and I want to traverse this list and send an email to every person on that list. Within a Flow, this would be a “For Each” action.
Here, we’re going to do the following: Take a ;ist of contacts and traverse this list and send an email to people that match a criterial on this list.
- Create new Flow
- Narrative: First, let’s create a new (Parent) Flow
- Use a “Construct” card to create a list of text (email addresses)
- Add four fields for email addresses and add them
- jane@doe.com
- john@doe.com
- judy@gmail.com
- joe@gmail.com
- Add a “List >> For Each” card to call the Child Flow
- Click the button to create a new Child Flow
- Drag the “list” output from the List >> Construct card to your “List >> For Each” card
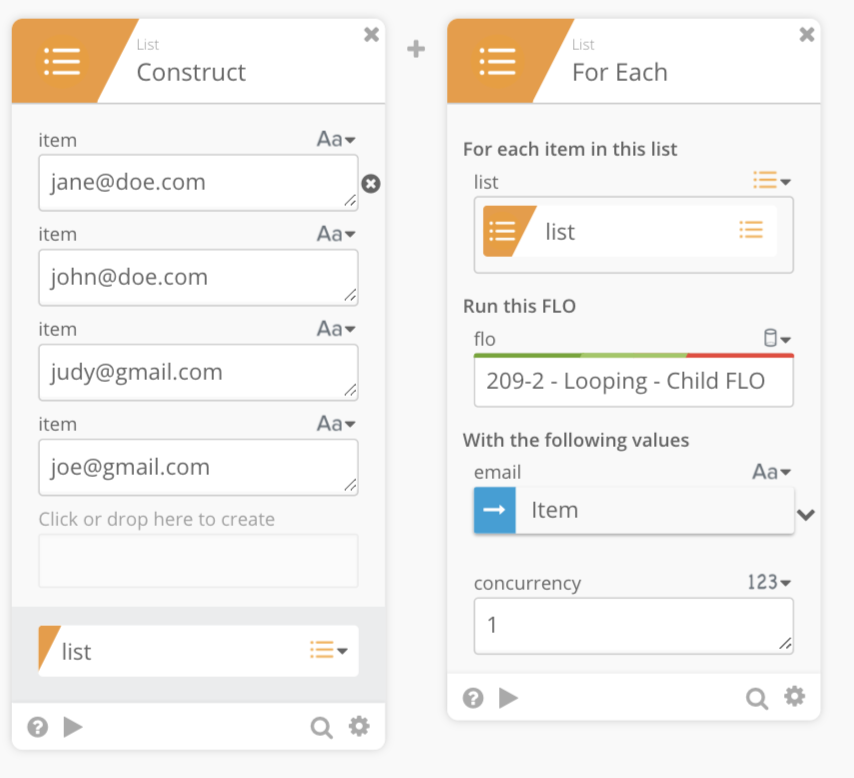
- Create the new Child Flow
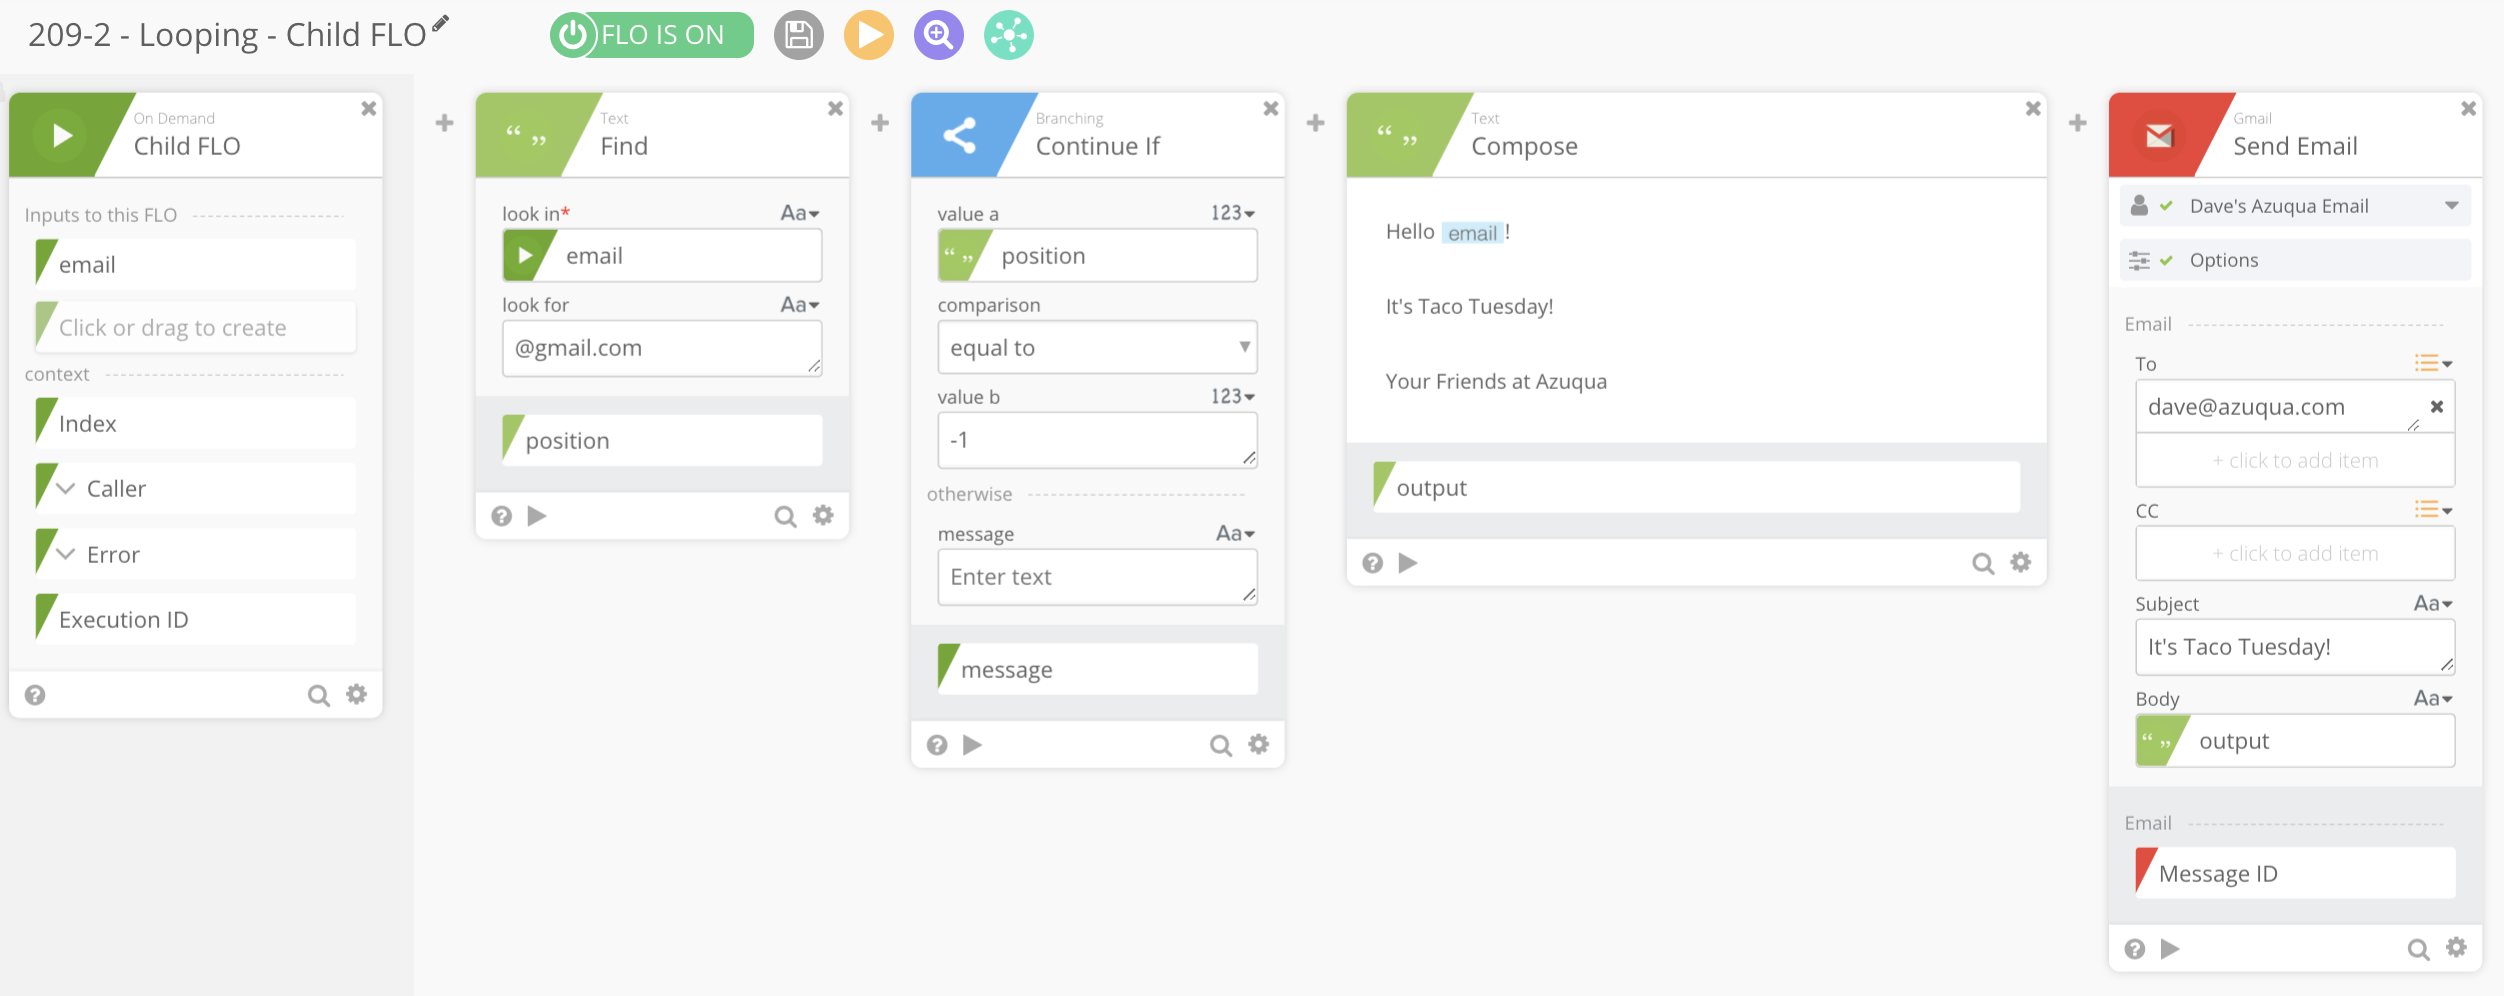
- Now, let’s jump over to the Child Flow. The parent is not quite finished, but we need to configure and test our Child card
- Set the inputs
- In this case: Email address
- This is an important key in working with Child Flows!
- They come directly from the item that is being processed, so if the object you’re processing has field X and Y, you’ll need to add those here.
- We want to send email to people on this list, so we’ll take each email - one at a time - and do something with them.
- Step 1: Add a “Text >> Find” Card
- Add the Text >> Find Card
- Look In: email (Drag email over to this field)
- Look for: “gmail.com”
- Step 2: Add a “Branching >> Continue If” card
- Set “Value a” = “position”
- Drag this from the output of the Text >> Find card
- Set “Comparison” equal to -1 (value b)
- NOTE This will filter out anyone with the “gmail.com” domain
- Step 3: Add a “Text >> Compose” Card
- Craft a message that you’ll want someone to read
- Drag the email field from the first card as the email
- Step 4: Add an email card
- NOTE This depends on your email client. If you have Gmail, use the “Gmail >> Send Email” card!
- For Testing, we suggest using your email in the “To” line
- Add a Subject of your choice
- Drag the output from the “Text >> Compose card”
- Save the child Flow and turn it on
Important: Note that this whole idea of child Flow is that you can do as many steps as you need on each item – one at a time.
Go back to the parent Flow and complete it … Note that the “email” field that we created in the Child Flow **now appears as an item in the “With the following values” section!
- Make sure the Child Flow you created is selected
- e.g. “209-2 - Looping - Child Flow”
- Select the email drop-down and choose “item”
- Save the Flow
- Run the Flow
Your Flow should look as follows …
Now run the Flow and make sure you’re getting the correct output.