This workbook is designed to accompany section 201 - Event Types.
Pre-Requisites
For this workbook, you should have your own environment with login credentials.
If you are using a Production environment, please take care with any existing processes.
You may also elect to use 30-day free Trial Org by visiting: https://azuqua.com/sign-up
Because this is an Integration product, we will encourage you to use freely-available applications within this material. Tools such as Twitter, Slack, and others are great products and typically allow you to sign-up for free!
Exercise 201-1
Example:
Suppose you use Smartsheet to track progress on your projects. Let’s say we just want to monitor to see if there’s a new row added and notify someone. (Realistically, you may be looking for a specific update - such as a milestone is completed, but for the sake of training we’ll keep it simple).
In this example, you should create a smartsheet, then create a Flow that looks at it. Add a new row to the sheet and then run the Flow to demonstrate that it’s being run.
Step 1: Create a Simple Smartsheet
- To get a free 30-day Smartsheet Trial
- Create a new Task List sheet and give it a name
- Within this sheet:
- Create at least one rows
- Assign the tasks to yourself
- Set dates to be current
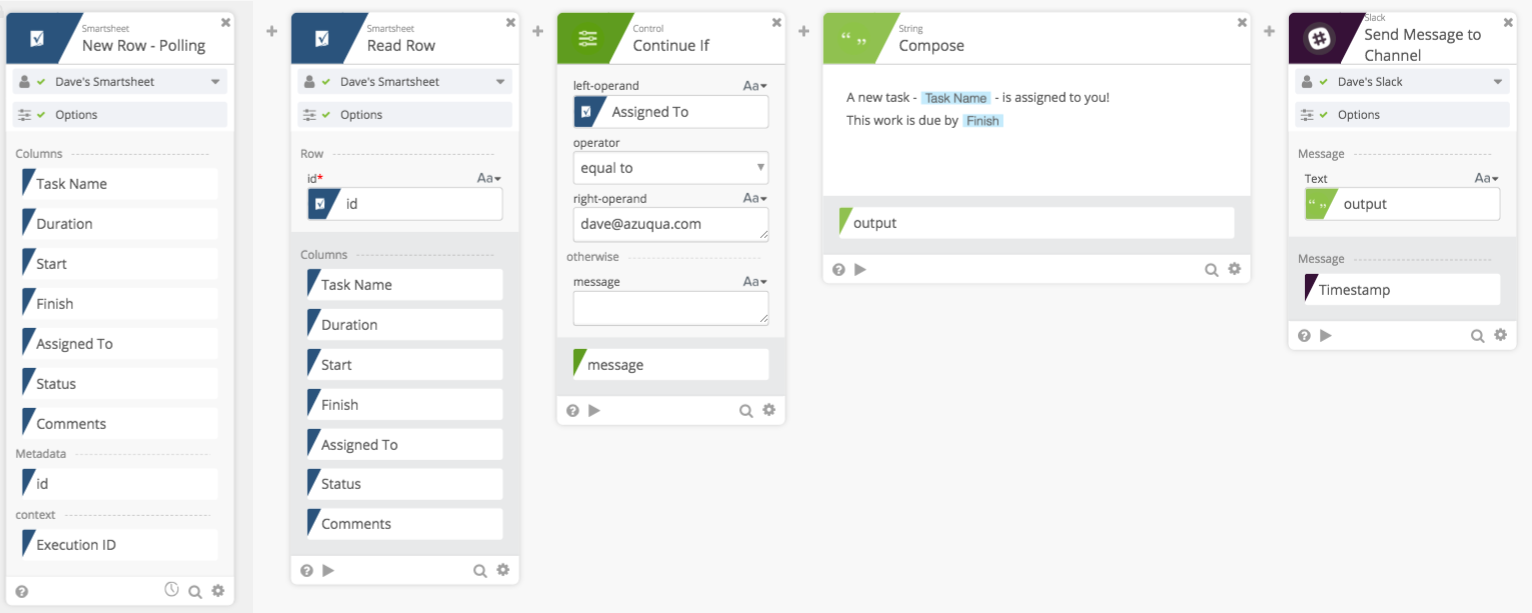
Step 2: Create a New Flow
- Create a Smartsheet Connections
- If you have not already configured a smartsheet connnection, do so before proceeding
- Create a new Flow
- Select your Smartsheet connectors
- Select the “New Row - Polling” Event
- Select your sheet name from Options and click “Done”
- Leave the Columns which are selected by default
- Add a “Smartsheet - Read Row” Card
- Click “Add Function” and select the “Smartsheet - Read Row” Card
- Again, select the Smartsheet from above within Options and click “Done”
- Drag the “id” field to the matching “id” field in the Read Row card
- Add “Control - Continue If”
- With this card select the following:
- Drag “Assigned To” to “left-operand”
- Set the operator to “equal to”
- Set the right-operand to your email address
- With this card select the following:
- Add “String - Compose” Card
- Compose a message similar to “A new task - TASK NAME - is assigned to you! This work is due by FINISH”
- The terms TASK NAME and FINISH should be dragged from the Event Card
- Optional: Set up a Slack Action to share the message
Save and run your Flow. You can stop after the Compose card and running the Flow will simply give you output.
Exercise 201-2
Again using Smartsheet, repeat what we’ve done in Exercise 201-1 but create a Flow using the “Webhook” event type.
- Duplicate your Flow
- Make a duplicate of your Flow from Exercise 201-1

- Delete the “New Row - Polling” Event
- Select a new Event - “Smartsheet - Row Updated - Webhook”
- Select your Smartsheet (same as previous exercise)
- Remap the ID by dragging it to the “Read Row” card
- Turn ON your Flow
- Add a new row to your Smartsheet
With a Webhook the Flow should execute and you can then review your results!
Exercise 201-3
A good example of the Invokable Event Type is with Workplace by Facebook events.
NOTE This exercise requires that you have Administrator access to a Facebook for Work account in order to complete.
- Review the Workplace by Facebook configuration to create a new bot
- Create your Flow
- Create a new Flow (+New Flow)
- Configure your Connection - Workplace by Facebook
- Select the Workplace by Facebook - New Bot Mention
- Click on the “Webhook Settings” Application
- Copy this back into the Bot you created in Workplace by Facebook (this is documented in the above link)
- Add Gmail - Send Email card
- Add your email in the “To” section
- Add a Subject (such as “New Bot Mention”)
- Drag the Message Text from the Event card to the “Body” field of the Gmail card
- Save and Turn On your Flow
To test, use your Workplace by Facebook and make a new mention.
Again, the difference between “invokable” and Real-Time (Webhook) is slight. Workplace by Facebook allows us to demo this pretty easily. The difference here is that we have manual work to do on the Workplace side to set things up.