In this module we’ll dive deeper into Flows that will help guide you to be successful when building your own. You’ll explore:
- Flow-cabulary (common vocabulary that you’ll need to know)
- Card Types
- Execution History
- Testing and Running your Flow
Course Material
In this module we’ll dive deeper into Flows that will help guide you to be successful when building your own. You’ll explore:
- Flow-cabulary (common vocabulary that you’ll need to know)
- Card Types
- Execution History
- Testing and Running your Flow
Flow-cabulary
The following are some of the common terms that you will encounter in the course of this training.
| Term | Description |
|---|---|
| Action | Actions allow the Flow to tell the cloud application to do something Pulls information from a connection |
| Card | A unit of functionality, either an action 1or event Visually represents actions and events |
| Connector | A pre-built framework that leverages API which allows your Flow to access to a specific cloud-based application azuqua.com/app-library |
| Connection | A connection is an instance of a connector |
| Designer | The User interface provided to you for configuring connectors and creating Flows |
| Event | Events allow you to monitor for changes within your cloud application. When a change has been detected, the Flow will executeYou can initiate your Flows from an application (most common), by schedule, and on-demand |
| Flow | A Flow is a term for “automated workFloww” or integration Represented by a trigger, a series of actions, and logic functions that are executed left-to-right in the designer |
| Function | A function sets values or manipulates data within a Flow The workhorse of Designer |
More About Flows
Before setting out to craft your Flow, we think it is critical to plan ahead. When thinking about your problem in the context of a Flow, try asking yourself some questions to get the ball rolling.
- What connectors do I need? Are they available?
- Do I have credentials to establish connectors
- What am I trying to accomplish?
- How/When do I want to run this Flow?
- What data do you need coming in and what data do you need coming out?
- What fields do I need?
- What transformations/manipulations must I make?
- What does success look like?
As discussed on the previous slide, it is important to have a plan. “Begin with the end in mind.” Exactly how you approach or construct your Flow is up to you. Some start with an event and move forwards and others begin with the end and work backwards. In the 101 module we demonstrated starting with a single card - somewhere in the middle - then building out from there. In order to give you a consistent guide, we’ll commonly move from left-to-right. Here is a good example of the Flow building process which we’ll dive deeper into.
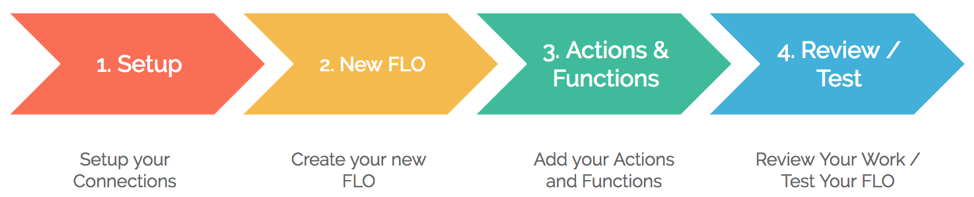
Step 1: Setup Connections
- To set up a connection go to Settings >> Connections
- Select your connector (i.e. Gmail, Slack, Trello)
- +New Connection
- Authorize the channel (i.e. entering your username and password)
- Rinse, Wash, Repeat for your other connections
- To ensure that your connections are setup, you should see a small green check mark adjacent to the App if everything is configured correctly
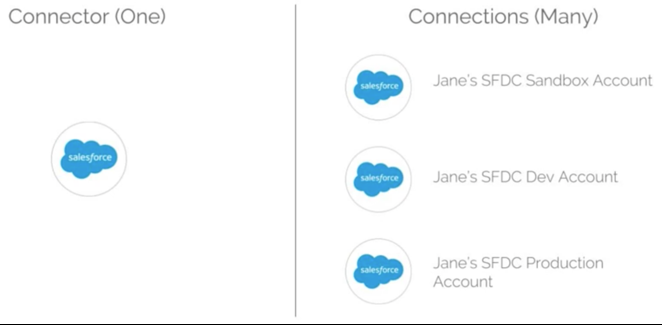
- Connections and Connectors
- Connectors are pre-built modules and provide the basis to connect or login to a specific application
- Connections are instances of a connector. You can connect as many accounts and instances as you would like. For one connector there may be many connections which represents a one-to-many relationship. For one connector there may be many connections.
- Example of connectors and connections:
Step 2: Create a New Flow
- Begin by pressing the green icon that says “+ New Flow”

- Once selected, you’ll be directed to this screen where you’ll see all your connected apps, Azuqua’s apps, and all applications
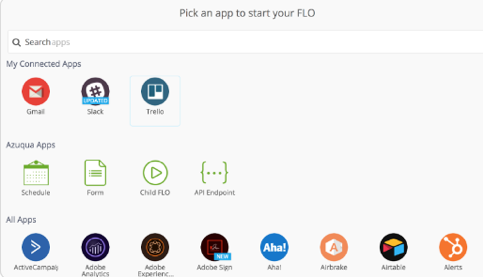
- From here, simply select the connector you’d like to use and you’ll be prompted to pick either an Action or Event
- Note that you can begin your Flow by an Event or an Action. Recall how in 101 we demonstrated how we could begin a Flow with an Action
- You’ll also notice Events are listed at the top and Actions towards the bottom, and depending on whether you select Action or Event, you’ll start at a different place in your Flow
Step 3: Add Actions and Functions
- Again, Actions represent the things you can do with your Connectors
- For example, when you select Smartsheet as your connector you’ll see all the actions that are available to you
- Within Smartsheet you have option to create a new sheet, list all your sheets, read a row, and many more as the image shows

- A Function sets values or manipulates data within a Flow. You have many options to choose from such as string (string is the programming language for text) manipulation, mathematical functions, list functions, and object functions.
- Functions are the workhorse of Designer and allow you to do either simple (set a value) or complex things (data lookups)

Step 4: Testing
- Always test your Flow! You can test it in any stage of the Flow building process and is great for error-handling
- There are many ways to test your Flow. You can test individual cards, sections or the entire Flow
- To test an individual card you can click the play icon at the bottom of a card. When you hover over it, it will say “Test This Card”

- To test the entire Flow you can click the “Test Flow” icon
- You can Save and Test your Flow by clicking on the save “Save and Test” icon
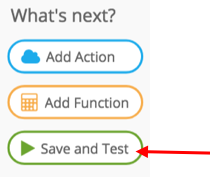
- OR, you can go back to the Home Page and test your Flow

As a part of testing, your Execution History is crucial in order to make sure data is Flow-ing correctly and is doing what you intended. This feature is not active, but can be enabled by:
- Saving your Flow for the first time OR by selecting “Flow History” and clicking “Enable Save Data” on the right hand side
OR
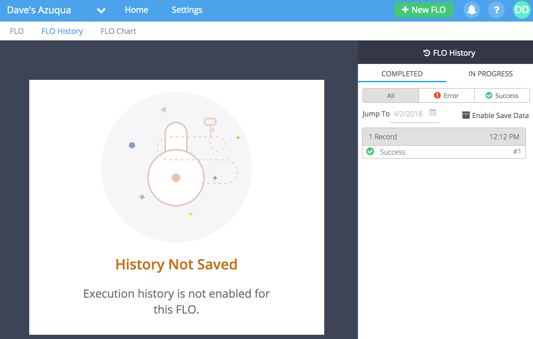
What’s nice about Execution History is that you’re able to see each card with real data. You can inspect the information that’s associated with each individual card and see how it flows from one card to another. Also, the product makes it easy to see where your Flow succeeds (green check mark) and fails (red exclamation mark) so you can make adjustments accordingly. Note that clicking on each time-indexed link on the RIGHT of the screen will give you a trace of THAT INDIVIDUAL Flow HISTORY. Like a TIME MACHINE for your Flows.
To round out this module, what’s equally important as everything else is to learn how to keep your Flows organized with “My Folder” so you can find what you’re looking for.
My Folder (Flows/Tables/Fields/Options)
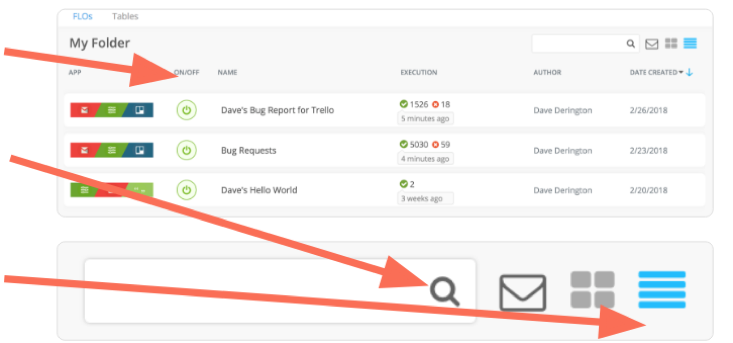
This is the main section where you see a list of all your existing Flows and Tables. In the My Folder section:
- You have ready-access to turn ON/OFF any given Flow
- You can click on a column header which will help you sort either by App, what’s on/off, by name of the Flow or table, the Author, and date creation or your most recently edited Flow or table
- You can also quickly search by clicking the field next to the magnifying glass
- Clicking the “Email” icon gives you the ability to fine-tune your notifications (FOR SPECIFIC FLOWS). For instance, should you want to know immediately when a Flow presents an error, you can set this!
- The last two icons (window pane and lines) give you control over how your Flows are presented
And Finally … Flow Notifications
Flow Notifications are the key to keeping tabs on your Flows… particularly early-on when you’re building new processes. If you click the “Email” icon, it will give you the ability to fine tune your Notifications.

When you click the email icon, this screen will appear:
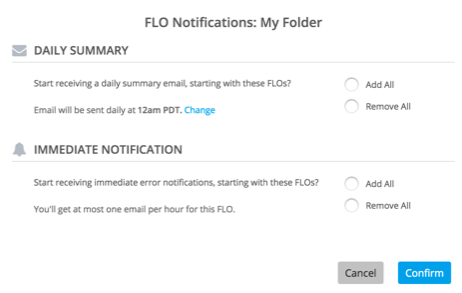
For instance, if all is well and Flows are working as designed, a daily summary may be all you need to keep abreast of your Flows.
Here you have the ability to set the time, etc.
If you want to know IMMEDIATELY when something is problematic, you can select the “IMMEDIATE NOTIFICATION” option. At most you’ll get one update per hour, but this is fantastic for really Business-Critical work!