This workbook is designed to accompany section Azuqua 101.
Pre-Requisites
For this workbook, you should have your own environment with login credentials.
If you are using a Production environment, please take care with any existing processes.
You may also elect to use 30-day free Trial Org by visiting: https://azuqua.com/sign-up
Because this is an Integration product, we will encourage you to use freely-available applications within this material. Tools such as Twitter, Slack, and others are great products and typically allow you to sign-up for free!
The Story - 101 Exercises
Your team is using a tool like Smartsheet to manage workload.
A Project Manager is creating tasks - but perhaps team members aren’t always looking at the sheet!
The team lead wants to notify team members via Slack because - as with most companies that use Slack - your team members are commonly engaged with it on a regular basis.
Exercise 101-1 - Create a New Flow
For this exercise, let’s begin by creating a Flow:
- Login to your environment
- Click “+ New Flow”
- Review the list of available apps
- My Connected Apps - Apps you’ve configured and are ready for use
- Azuqua Apps - These are specific to our platform (like Tables)
- All Apps (connected or not)
- Scroll down and select “Child Flow”
Note: At this point in the tutorial we are not selecting an app. We’re doing this so we can test without being dependent on an event. In Exercise 101-6 we will add and test the completed Flow.
Exercise 101-2 - Add Action: Read Row
Now, let’s add a new action by selecting +Action - “Read Row”. Here we will get the Row ID from the Event (New Card in List). Then, we will retrieve information about that card that we’ll import into Slack.
IMPORTANT: For this exercise you’ll need to use Smartsheet. It’s free to sign up: https://www.smartsheet.com/try-it-r
Creating a Smartsheet
- With your Smartsheet account, create a single sheet with the following columns
- Task name, Duration, Start, Finish, Predecessors, Assigned To, Status
- Create a single row using the Start Date as today.
- Assign to yourself
- The resulting sheet should look like similar to the following image

From your existing Flow
- Select “Read Row”
- Click “New Connection”
- Select Smartsheet
- Set a Nickname (something descriptive)
- Authenticate with your account & NOTE: You should see a GREEN DOT next to your connector if it’s configured correctly!
Select a Smartsheet Sheet
- In my case, I’ve created a sheet called “Work Assignment Test” with just one row
- Click “Done”
- Select your fields
- Accept the defaults
- Also select “Assigned To”, “Status”, and “Comments”
- Click “done”
Test the Card
As you learn Azuqua Flow Building, it’s important to get a sense of what’s happening - so here we’re going to add cards and test them as we go.
For this card we need to have the Row ID! Smartsheet makes this easy to get:
- Go to your Sheet
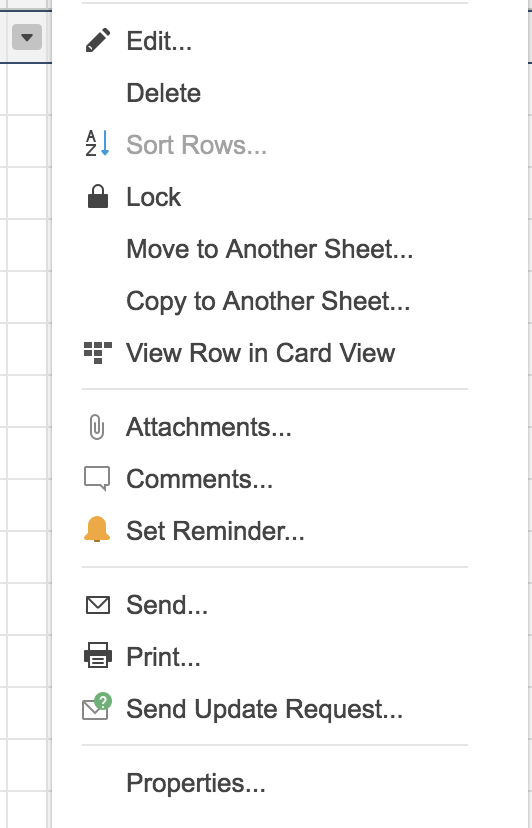
- On the row, select the “down arrow” adjacent to the row
- Select “Properties”
The Row ID is listed on this page as you can see in the following image. Copy this string.
- Save your Flow
- Give it an appropriate name and description
- Click the “Play” icon at the bottom of the card
- Review the results - you should see data
Exercise 101-3 - Add Function: Continue If
Next we need to inspect the message and see that it contains a specific value. In other words, let’s add some smarts to our Flow and make sure this only runs IF the task is assigned to a specific person.
To do this, we’ll use the “Continue If” function. Continue If will continue or halt the Flow based on the result of a true or false conditional test.
- Click the “+” next to your last card
- Add Function >> Control >> Continue If
- Drag the “Assigned To” field into the “Left Operand” field
- Set the Operator to “equal to”
- Set the “Right Operand” field to your email address
Test your entire Flow by clicking the Yellow Play button at the top of the screen. If configured correctly, this card will only continue if this condition matches.
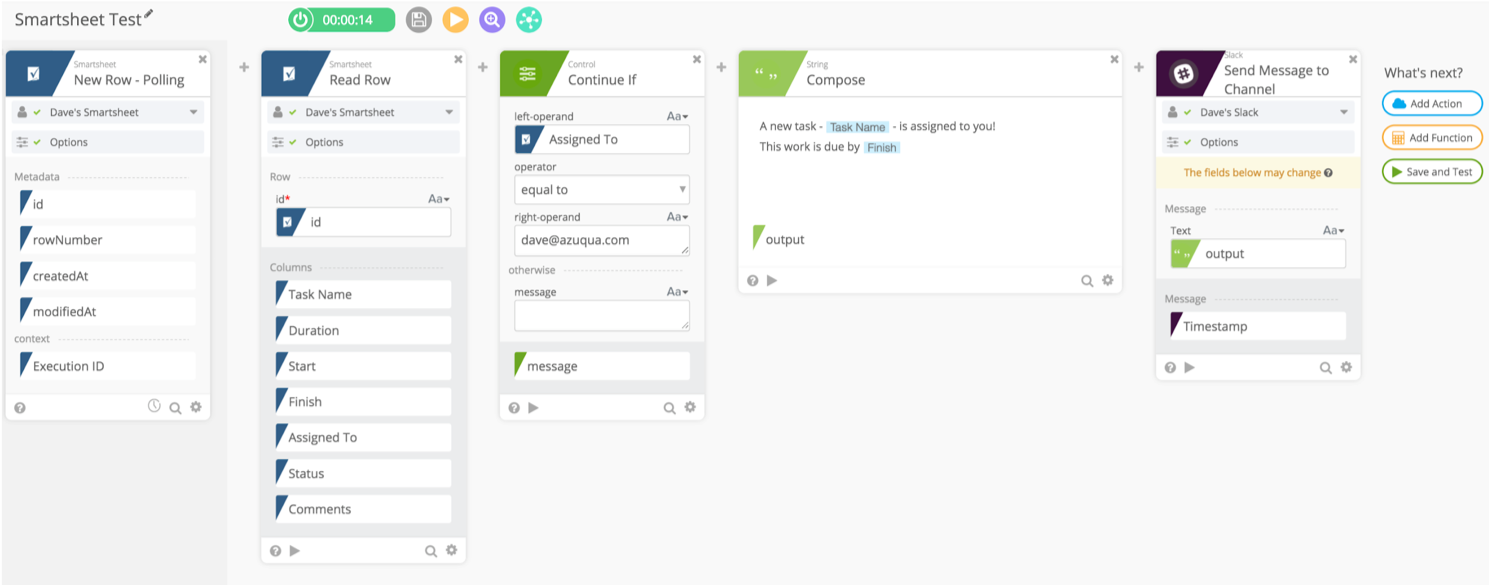
Exercise 101-4 - Add Function: String - Compose
Now that we have the Continue If in place - we want to craft what will go into the Slack notification
- Select + Function >> String >> Compose
- Craft your message
- Drag and Drop fields such as …
- Task Name
- Assigned To
- Status
- Comments (which is optional and up to your preference)
This will give our team member all the details without having to login (at least now) to Smartsheet!
We don’t need to test this quite yet, but if you wish you can do the same as you did with the Read Row card by clicking the “Play” icon at the bottom of the card.
Exercise 101-5 - Add Action: Slack - Send Message
For this section, we’ll use Slack. As with other applications featured within this workbook, to follow along you can use an existing Slack account, or a free one.
Now, let’s continue by adding an ACTION for Slack so we can send the message to the Task Owner:
- Click Add Action
- Select “Slack”
- Select “Send Message to Channel”
- Take (Drag) the output of the String - Compose
- Select your Channels
- If you haven’t created one, you can use any channel or create a new one
- For this demo, I created the #todo channel
- Then select
- Send as bot? “No”
- Unfurl URLs? “Yes”
- Drag the output from the Compose card to your Slack card
Again, test your Flow. If everything worked correctly, you should get a notification.
Exercise 101-6 - Add (Trigger) Event
Here, we want to run our Flow when a new task (row) in Smartsheet is created. Let’s revise our Flow to add in a Trigger Event.
To add an event, notice the large square to the left of the screen that says “Add an event to trigger your Flow”.
- Click the “Add an Event” button
- Select “Smartsheet” from “My Connected Apps”
- Select “New Row - Polling”
- This will check periodically (like every 5 minutes) for a new row
- Under OPTIONS, select your Smartsheet sheet
- Once the Outputs appear, drag the ID to the “Read Row” Card
- NOTE: We could - technically - drop the Read Row card because we already get all this information
Exercise 101-7 - Run the Flow!
We have a fully fleshed-out Flow and are ready for testing!
Naturally, you’d want to select the “Check for new data” button. If you do this without having new rows in your Smartsheet workbook, you of course will get no results! So … let’s add a row and test our Flow end-to-end:
- Add a new task to Smartsheet
- Select today’s date, assign the task to yourself, set status
- Save Smartsheet and run the Flow
It’s good form to watch the Flow execute so you see data moving through the system. If everything is correct, you’ll see a notification in SLACK!