Getting Started
For a full JSON definition of the connector we’ll be building, click here.
This guide walks through how to build a connector that allows you to send an email with your SendGrid account. Make sure your organization has access to connector builder. Review this help page or reach out to support@azuqua.com if you need assistance.
Design
We will need a single method called “Send Email” that will use this endpoint from the SendGrid API docs. Note: you will need a SendGrid account in order to create an API key (scroll towards the bottom and you can choose ‘Sign up for Free’ if you don’t already have an account).
Inputs
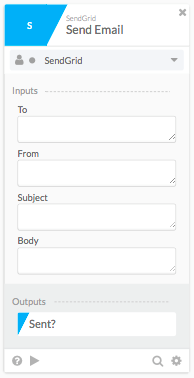
Based on the API documentation, we know we will need the following values to be input by the user: To email address, From email address, Subject, and Body.
Outputs
The only output provided in the response is a status code, so let’s set up an output called ‘Sent?’ that will indicate if the email was sent successfully or not. Here’s what we’d like the card to end up looking like:
Now we know what we are building towards, let’s create it!
Connector Authentication
The SendGrid API requires an API Key that can be generated in your SendGrid account details menu. In Connector Builder, you will notice we have several authentication template options. For this connector we will use ‘custom’:
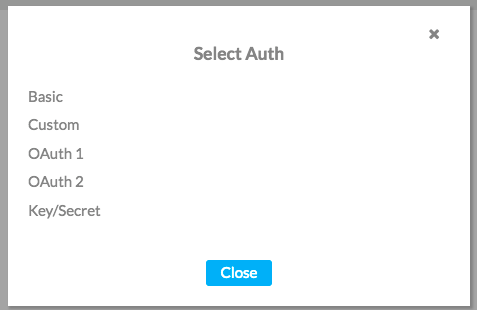
This allows us to specify an input that will be surfaced to the user when they choose to ‘Add Account’ on the connector card. Here’s what you will see after you select ‘Custom’:
{
    "type": "custom",
    "authparams": {
        "": {
            "type": "string",
            "displayname": ""
        }
    }
}
We need to set 2 values: the display name and the variable name that we can use to reference this value in subsequent connector code. Let’s set the variable name as ‘key’ and display name as ‘API Key’:
{
    "type": "custom",
    "authparams": {
        "key": {
            "type": "string",
            "displayname": "API Key"
        }
    }
}
For more information about authentication inside of connectors, see this article.
Creating Our Method
Now let’s set up the “Send Email” action. To start, click on “Actions”, and select “Add Method”.
This method will be an “Action”, because this API interaction will only ever need to take place after a Flow is triggered. If we had wanted to build a method that would trigger Flow, we would have done these exact same steps with the “Events” list. For more information about Actions and Events, review this help page.
After you’ve named your method and (optionally) added your description, you will see a bunch of information pop up on the left-hand menu and in the editor. The connector builder has generated the template of the method and now we need to set the inputs and outputs.
Check out the new method on the left-hand menu and see there are two sections: params/input/output and Core.
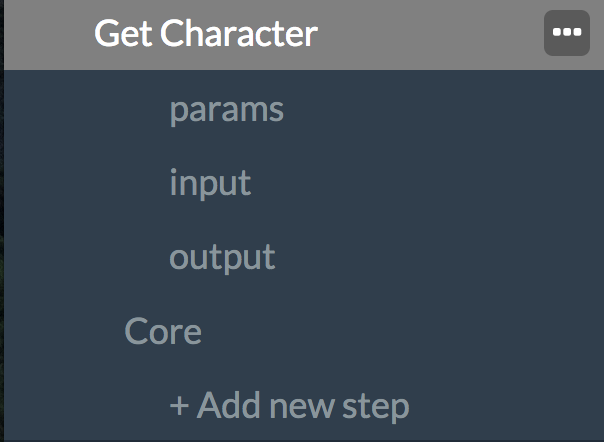
Params, input and output are all places where you define the UI elements of your method’s card. The Core section is responsible for all data processing.
UI
Let’s define the UI for our method’s input. Click on the “input” section, underneath the name of your method. You will see this:
{
    "extensible": false,
    "attributes": [
        {
            "name": "",
            "attributes": [
                {
                    "name": "",
                    "type": "string"
                }
            ]
        }
    ]
}
Similar to the authentication brick, the top-level attributes represents each group of inputs as designated by a header. Inside of this is another layer of “attributes”, which designate the items inside of each group of inputs. Referencing the screenshot of our desired end result above, we need inputs (To, From, Subject, Body) underneath a header called “Inputs”. We’ll set the header as ‘Inputs’ and individual fields like so:
{
    "extensible": false,
    "attributes": [
        {
            "name": "Inputs",
            "attributes": [
                {
                    "name": "To",
                    "type": "string"
                },
                {
                    "name": "From",
                    "type": "string"
                },
                {
                    "name": "Subject",
                    "type": "string"
                },
                {
                    "name": "Body",
                    "type": "string"
                }
            ]
        }
    ]
}
Now, onto the output section of our card. This is pretty simple as the only output we need is a value ‘Sent?’ to indicate if the email was successfully sent or not. We will call our header ‘Outputs’ and define the attribute like so:
{
    "extensible": false,
    "attributes": [
        {
            "name": "Outputs",
            "attributes": [
                {
                    "name": "Sent?",
                    "type": "boolean"
                }
            ]
        }
    ]
}
Note: notice the ‘Sent?’ output is type boolean. You can set the type of the output to whichever matches the desired user experience for the data you are working with.
Core
Now that we have the UI of our method done, let’s get started on actually building out the functionality of our connector. A connector wouldn’t do any good if all it did was render a card in the Azuqua Flow tool, we need it to also grab data from our service, and then format that data in a way that will align with the UI we just built.
Inside the Azuqua connector builder, functionality is determined through a chain of “modules”. Each module begins as JSON, and is compiled into Javascript. Inside the original JSON definition, we set the inputs into that underlying Javascript function to define how we would like it to run. For more information about modules, reference this help page. After the underlying Javascript function is run, we receive an output that represents the results of that function. For example, a JSON.Parse module would require the developer to define the stringified objects they would like parsed as an input, and can expect back a parse JSON object as an output.
Let’s take a look at what modules we’ll need to use to complete this method’s functionality. We’ll need modules that can do the following:
- We’ll need to POST a request to the SendGrid ‘Send Email’ API endpoint
- Then we’ll need to compare the status code in the response to determine if the email was sent successfully (remember: 202 is a success)
- Finally we’ll need to show a true or false value for ‘Sent?’ that will be shown in the Flow Designer
Note: If, while building these modules, you come across this error while saving:
{
    "message": "action method must return an object",
    "type": "INVALID_CLOSE_TYPE",
    "channelMethod": "myMethodNameHere",
    "parent": []
}
This means that your Action method needs to have it’s last output be a single object, as the engine needs to know how to tie the data to our current UI framework. So, if the last module in your method has more than one output (like most HTTP bricks) or has an output that is a collection, you will see this error pop-up. To fix it, just add in a module that ends with a single, non-collection output (like Object.Construct).
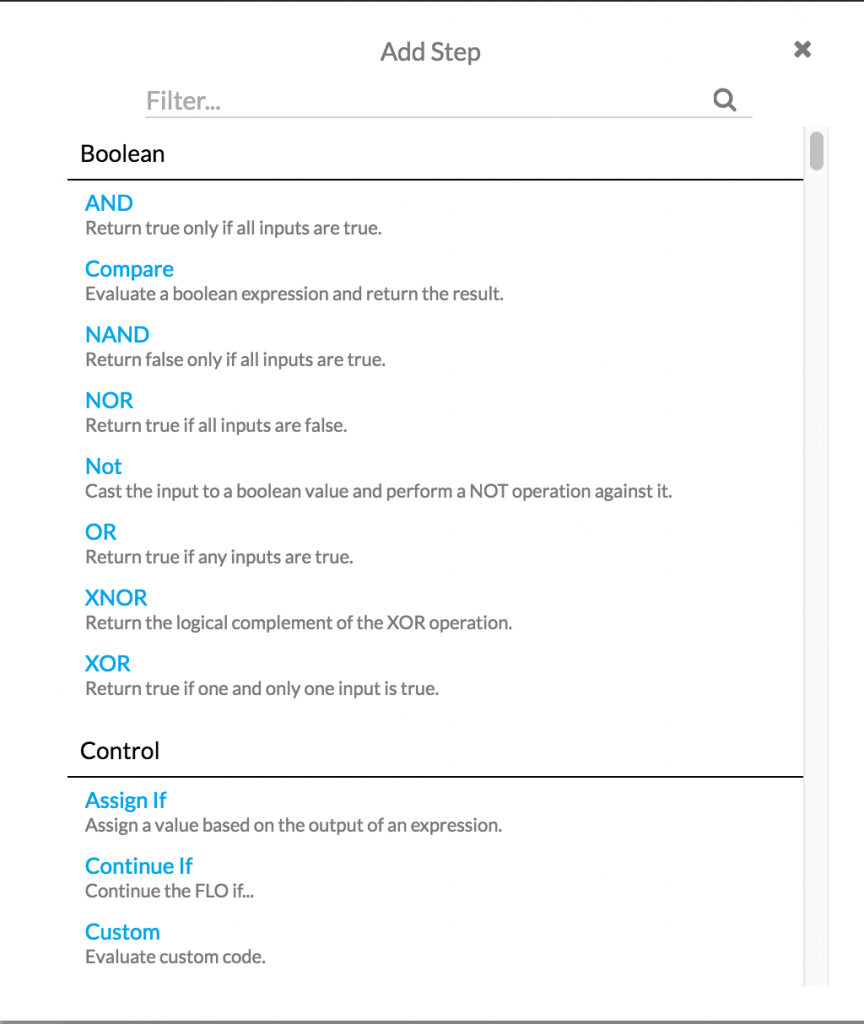
Inside of your method, under the subtitle “Core”, click on “+ Add Step”. This will bring up a menu of all the available modules:
HTTP Post
Since we know we’ll be interacting with an HTTP endpoint, go to the “HTTP” section. Here, we’ll see a number of options, but we’re only interested in doing a POST operation so select “HTTP Post”.
Once you do, it’ll bring up a JSON template like this:
{
    "brick": "http.post",
    "id": "S19OF",
    "inputs": {
        "url": {
            "_availableTypes": [
                "string"
            ],
            "_type": "string",
            "_array": false,
            "_value": null
        },
        "filterEmpty": {
            "_availableTypes": [
                "boolean"
            ],
            "_type": "boolean",
            "_array": false,
            "_value": true
        },
        "ssl": {
            "cert": {
                "_availableTypes": [
                    "string"
                ],
                "_type": "string",
                "_array": false,
                "_value": null
            },
            "key": {
                "_availableTypes": [
                    "string"
                ],
                "_type": "string",
                "_array": false,
                "_value": null
            },
            "ca": {
                "_availableTypes": [
                    "string"
                ],
                "_type": "string",
                "_array": false,
                "_value": null
            },
            "passphrase": {
                "_availableTypes": [
                    "string"
                ],
                "_type": "string",
                "_array": false,
                "_value": null
            }
        },
        "body": {
            "_availableTypes": [
                "object",
                "string"
            ],
            "_type": "object",
            "_array": false,
            "_value": null
        },
        "headers": {
            "_type": "object",
            "_array": false,
            "_value": null
        }
    },
    "outputs": {
        "statusCode": {
            "_type": "number",
            "_array": false
        },
        "body": {
            "_type": "object",
            "_array": false
        }
    }
}
That blob is JSON definition for our HTTP.Post function. For now, we can get rid of all the items in the “inputs” section that we don’t need, remembering that each of these items represents a parameter into its underlying function. For the SendGrid API, this means we can get rid of everything but “url”, “headers”, and “body”, since those are the only sections we need to customize for this module. Documentation for each module can be found beneath the Modules category on the sidebar.
You will be left with this:
{
    "brick": "http.post",
    "id": "POST",
    "inputs": {
        "url": {
            "_availableTypes": [
                "string"
            ],
            "_type": "string",
            "_array": false,
            "_value": null
        },
        "body": {
            "_availableTypes": [
                "object",
                "string"
            ],
            "_type": "object",
            "_array": false,
            "_value": null
        },
        "headers": {
            "_type": "object",
            "_array": false,
            "_value": null
        }
    },
    "outputs": {
        "statusCode": {
            "_type": "number",
            "_array": false
        },
        "body": {
            "_type": "object",
            "_array": false
        }
    }
}
Note: we renamed the custom id to ‘POST’ - this makes it easier to reference in subsequent steps. Let’s fill in the rest of the values. First for “url” let’s grab the general URL that we will need, “https://api.sendgrid.com/v3/mail/send", and stick it in the “_value” key for that input.
"url": {
    "_availableTypes": [
        "string"
    ],
    "_type": "string",
    "_array": false,
    "_value": "https://api.sendgrid.com/v3/mail/send"
}
Next for the body let’s grab the request format they provide and enter that in the “_value” key. Instead of using the hardcoded values from their API documentation, let’s use mustache references to grab the values input by the user.You can access any outputs of any previous modules by using Mustache in this format: “{{ModuleIDHere.outputNameHere}}”. To find your module ID, look at the top of the module for the “id” key. Its value is your module’s ID. You may also change this value to whatever suits your needs. This will look like so:
"body": {
    "_availableTypes": [
      "object",
      "string"
    ],
    "_type": "object",
    "_array": false,
    "_value": {
      "personalizations": [
        {
          "to": [
            {
              "email": "{{input.Inputs.To}}"
            }
          ],
          "subject": "{{input.Inputs.Subject}}"
        }
      ],
      "from": {
        "email": "{{input.Inputs.From}}"
      },
      "content": [
        {
          "type": "text/plain",
          "value": "{{input.Inputs.Body}}"
        }
      ]
    }
}
Finally let’s set the header values. Again referencing the SendGrid API documentation let’s add headers for Authorization and Content-Type. We will use mustache to pass the API Key input by the user. The value is type object and looks like so:
{
    "Authorization": "Bearer {{auth.key}}",
    "Content-Type": "application/json"
}
Boolean Compare
We know from the API documentation that the response we will get from the SendGrid API is a status code, and we want to check if the status code is ‘202’ meaning the email was sent successfully. If so we want to show the output ‘Sent?’ as ‘true’, otherwise we want to assign ‘false’. We can use the Boolean Compare method to accomplish this, so select ‘+Add Step’ below the HTTP Post.
We’ll reference the output from the HTTP Post as “{{POST.statusCode}}” in the left operand, and set the right operand to type ‘number’ as 202. Here is what the JSON brick will look like:
{
    "brick": "boolean.compare",
    "id": "COMPARE",
    "inputs": {
        "left-operand": {
            "_availableTypes": [
                "string",
                "number",
                "Date",
                "boolean",
                "object"
            ],
            "_type": "string",
            "_array": false,
            "_value": "{{POST.statusCode}}"
        },
        "operator": {
            "_type": "string",
            "_array": false,
            "_value": "=="
        },
        "right-operand": {
            "_availableTypes": [
                "string",
                "number",
                "Date",
                "boolean"
            ],
            "_type": "number",
            "_array": false,
            "_value": 202
        }
    },
    "outputs": {
        "result": {
            "_type": "boolean",
            "_array": false
        }
    }
}
Object Construct
Finally we will set our object construct to output the value returned from the Boolean Compare as the ‘Sent?’ output we set in the UI. Select ‘+Add Method’ below the Boolean Compare and use ‘Object Construct’. Here is how the JSON will look with the mustache reference from the Boolean Compare:
{
    "brick": "object.construct",
    "id": "CONSTRUCT",
    "inputs": {
        "Outputs": {
            "Sent?": "{{COMPARE.result}}"
        }
    },
    "outputs": {
        "output": {
            "_type": "object",
            "_array": false
        }
    }
}
Let’s save our connector code and test! Select the ‘Save’ button and then ‘Run’. This should look familiar, as this is the structure of the data we built in the UI section. The blank (“”) value represents what would be passed into our method at runtime. Let’s test with your actual SendGrid API Key, and test values for ‘To’, ‘From’, ‘Body’, and ‘Subject’. After values are entered for each select “Submit”.
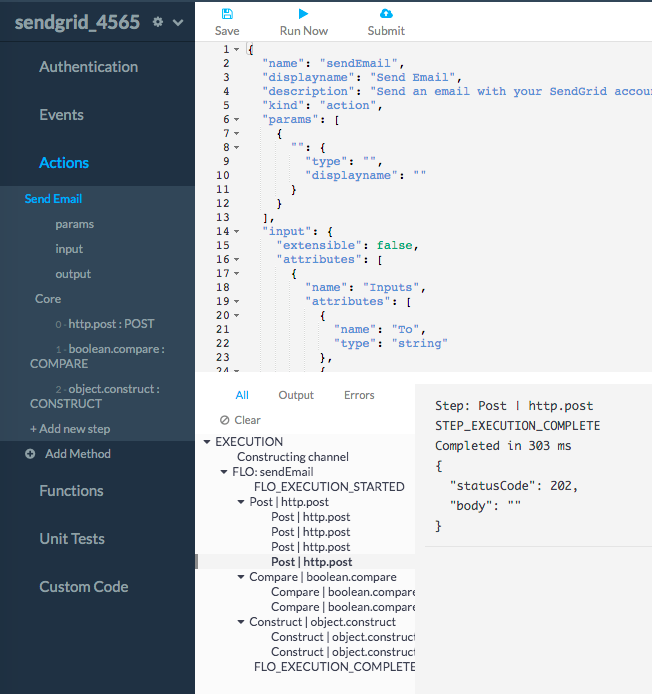
Now, you’ll see that the bottom panel has filled in some logs for you about our HTTP.Post, Boolean.Compare, and Object.Construct operations. You’ll see four logs for each module when you run your method. The first two represent what the underlying function is taking in, and the second pair represent what is coming back out of that underlying function. As you can see, we get back a “statusCode” output, and then the service response in the “body” output. This is where all the data for our method can be found.
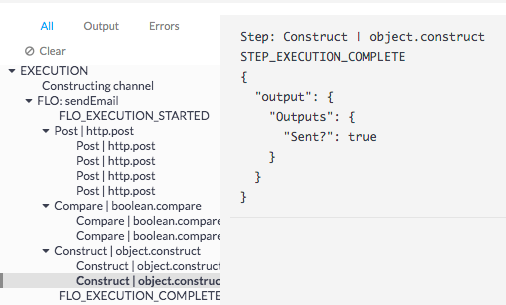
Notice the final step in the object.construct shows our ‘Sent?’ value as expected based on the testing logs above:
We’re done! You just built a custom API integration into the Azuqua platform. Now let’s see it in a Flow.
To get our connector into the core Azuqua platform, we first need to save and submit it. Click “Save” in the toolbar, then “Submit”. This will prompt you to submit this connector file as a version of your connector. Please use proper semantic versioning. Incrementing the major version of a connector will break Flows operating with your connector.
I’ll be submitting this as 1.0.0. Once it’s submitted, navigate to the “Control Panel” in the upper navigation bar.
Once here, you will see a (likely short) list of connectors that your organization has built. Here is where we deploy and manage the connector versions that are available in the main Azuqua platform.
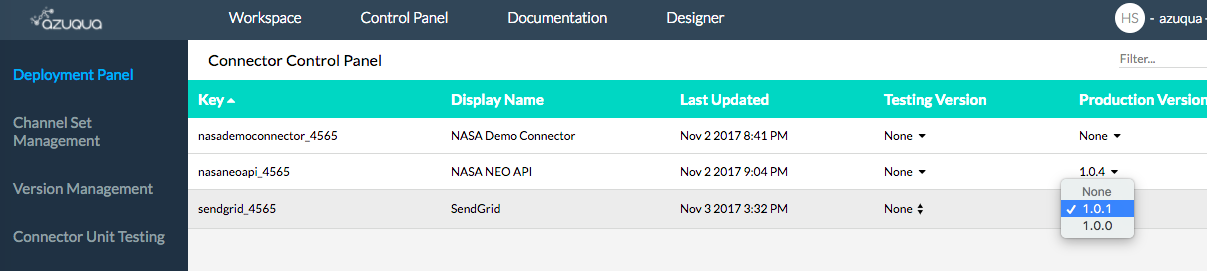
You will notice “Testing Version” and “Production Version”, for now we won’t worry about this, but if you’re curious, look here. So, select the “Testing Version” by your connector name, and select the version you just submitted from that dropdown. Once selected, click the “deploy” button, and wait for your connector to deploy to the Azuqua Flow building environment.
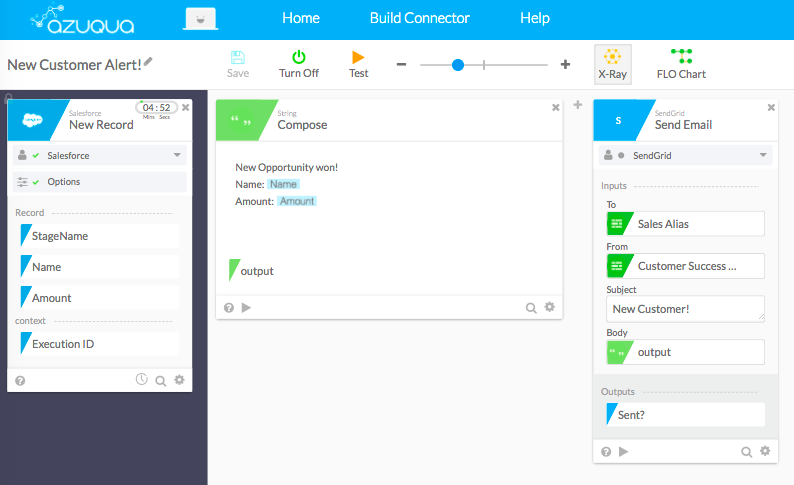
Navigate to the main Azuqua platform (available via either URL or the “Designer” navigation menu item), and start building a Flow! Try adding your brand new connector as a step in a Flow.
Congrats! You’ve built a connector!