Goals
This guide will walk you through building a new connector Action / Event that will leverage the provided template below.
- Using an existing connector’s Custom API Action (CAPIA) in conjunction with the provided template, that the developer will be able to replace placeholder variables in the template to quickly build a net-new action or event with low friction.
- User should be able to copy-paste the given template as a new action/event, replace placeholder variables, and add minor data transformation logic to the post-processing function.
- Produce action/events with low time to development (TTD).
Walkthrough Video
Prerequisite
- This assumes that the connector already has a fully functioning Custom API Action, with supporting functions complete and ready to develop against.
Instructions
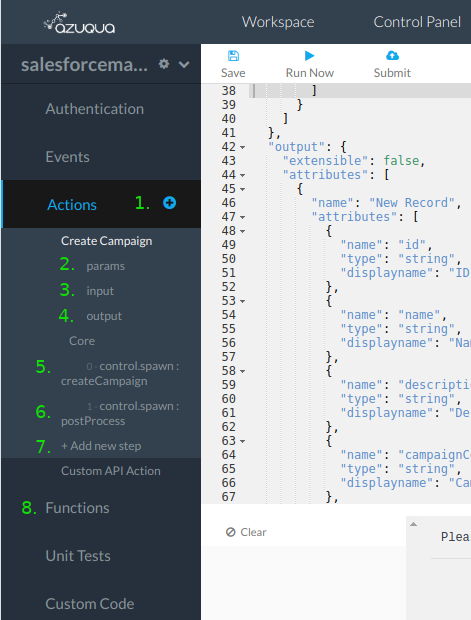
Legend
- Add Action button (New Action)
- Action Parameters/Options
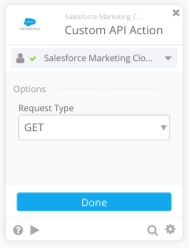
- This is the ‘Options’ tab that is rendered in designer.
- Action Input Fields
- Action Output Fields
- Action module - Call Custom API Action
- Action module - post-processing function
- Add new step button - add a new module to the bottom of the list of Core modules.
- Functions section
- This is where the helper functions exist. This function library is accessible by any action.
- Add Function button (New Function)
- Post-processing function
- Example of a working post-process function.
- Called by 6. - the action module that calls the post-processing function.
- Object Construct module/brick
- Required. Must always be the last brick/module in the post processing function.
- This is where most of the user-implemented logic will go. Must go before the final
object.construct.
- Add new step button
- Add a new brick/module to the post process function.

Walkthrough
Notes:
- It is recommended that you approach building this connector by leveraging the separate template components, and add them incrementally to your new action. For example, first paste the entire Parameters template into the action’s
paramssection by replacing all of the existing placeholder text forparamsin Forge. - Placeholder variable names: All template placeholder variables and values are indicated using the
<VARIABLE NAME>structure.- Template placeholder variables indicated by <> characters, with capitalized naming conventions.
- You will be required to replace all placeholder names with your own names.
- Ensure that all like-named placeholder values are consistent throughout all of your connector code. For example,
<INPUT FIELD HEADER NAME>exists in multiple sections. It will be required that the name is consistent across all occurrences.
- The following steps will reference the above images and the legend.
Steps
- Create a brand new action in Forge for the desired connector.
- Click the ‘+’ button next to Actions (1).
- Give your action the desired Display Name.
- Enter a description for this action. This will be visible in designer.
- Copy the Parameters template, and then click on the params section (2). Replace the boiler plate code with the template.
- Replace all placeholder values with your own desired value.
- Copy the Input template, and then click on the input section (3). Replace the boiler plate code with the template.
- Replace all placeholder values with your own desired value.
- These will render your fields on the card in designer.
- Ensure to use the API value for the
namefield. Thedisplaynamefield can be anything you like.
- Copy the Output template, and then click on the output section (4). Replace the boiler plate code with the template.
- Replace all placeholder values with your own desired value.
- These will render your fields on the card in designer.
- Ensure to use the API value for the
namefield. Thedisplaynamefield can be anything you like.
- Copy the Core Module - Call Custom API Action template, and then click the ‘+Add new step’ button, just under ‘Core’ (7).
- A pop-up window will appear. In the search bar, type ‘call’. Select the ‘Call Flow’ module from the Control section.
- We will replace this module’s placeholder text, so you can choose any item from the list of modules if desired.
- Paste the Call Custom API Action template and replace all of the existing placeholder text.
- Replace placeholder variable names
- This will require some knowledge of the service’s API. Consult the API docs for the service to determine how to structure your request.
<RELATIVE URL>- Replace with the relative URL of the API endpoint that you will be working with. Refer to the Custom API Action help docs for info about the required relative URL structure for that API.<INPUT FIELD HEADER NAME>- This will be the same value that you entered for the Input template.<REQUEST METHOD TYPE>- This will be one ofGET,POST,PUT,PATCH, andDELETE.
- This will become (5) in the first image above.
- A pop-up window will appear. In the search bar, type ‘call’. Select the ‘Call Flow’ module from the Control section.
- Copy the Core Module - Post Process function template, and then click the ‘+Add new step’ button again (7).
- Choose the Call Flow module again.
- Paste the Post Process template and replace the existing placeholder text.
- Replace
<POST PROCESS FUNCTION NAME>with your desired name for the Post Process helper function. For example, this could bereadRecordPostProcessor similar if you are creating an action to read a record.- You will not be able to save if you have not created a Function with this name yet.
- This will become (6) in the first image above.
- Copy the Metadata / Post Process function template.
- Click the Function (8) tab, and then click the ‘+’ to the right of the Function tab (9) to create a new Function.
- A modal window will pop up to prompt you to name the function. Enter the name that you gave it in the previous step for
<POST PROCESS FUNCTION NAME>. - Under the Metadata Function(s) section, copy the Post Process Function and replace the array brackets
[]next to zebricks in your existing post process function. This will populate anobject.constructmodule inside your function. - Replace placeholder variable names
<OUTPUT FIELD HEADER NAME>- this will be the same value that you used in your output template.- Replace the output field placeholders.
- Ensure that the existing
object.constructthat is pre-populated in this template remains as the last module/brick in this function. This is required so that the action will return your output field values correctly.
- All logic that will be added to this function will necessarily need to be added before the existing
object.constructwith the output fields. IMPORTANT - The final step is adding additional logic to transform the data that is coming from the response body and pass it to the defined output fields in the post process function. In some cases, you will not need to do any additional logic to map the fields if they are top level keys in the response. Another common case is map or filter over the response.
- To add a new step above the
object.constructstep, hover over theobject.constructmodule in the function on the left, and click on the three dot button that appears. Then click ‘Add step above` button. - Choose the required module/brick that is right for your use case. Many of the modules that you will find are similar to the Designer functions, so they should be familiar.
- To add a new step above the
OPTIONAL If you are using dynamically generated input/output fields:
- Feasibility - In order to leverage the template for dynamically generated I/O fields, it is required that the service’s API meets a few requirements.
- There must be an existing API endpoint that returns metadata about the fields that align with the use case.
- That endpoint must return a list of objects, and each object must contain the necessary information about those objects. This will not work if the endpoint does not return the fields as a list of objects.
- At a minimum, there should be a unique identifier (usually an ID), and a display name. You can use the same value for both
nameanddisplayNameif necessary.
Implementation
- First create the wrapper function by copying the wrapper function template that wraps the
dynamicIofunction. - Click the Function (8) tab, and then click the ‘+’ to the right of the Function tab (9) to create a new Function.
- A modal window will pop up to prompt you to name the function. Enter the name that you gave it in the previous step for
<CUSTOM FIELD WRAPPER FUNCTION NAME>. - Paste the copied wrapper function template to replace the placeholder text.
- IMPORTANT Ensure that you do not overwrite your
nameordisplaynamefor the function. Replace placeholder variable names
<CUSTOM FIELD WRAPPER FUNCTION NAME>- Name your function. This will be the value that we enter in the I/O definition.<REQUEST METHOD TYPE>- This will be one ofGET,POST,PUT,PATCH, andDELETE. This will usually be aGETrequest. Refer to the service’s API documentation to determine the correct method.<REQUEST RELATIVE URL>- The relative URL of the API endpoint that returns the list of fields. The relative URL is based on the connector’s Custom API Action, so refer to the Custom API Action to determine the relative URL structure.<REQUEST HEADERS>- The headers required to perform the request. This is an object. Leave an empty object if no additional headers are required.<REQUEST BODY>- The request body to perform the request. This is an object. Leave an empty object if no request body is required.<FIELD UNIQUE IDENTIFER>- The path of the field that contains the unique identifier value for a given field. This is the path inside each object in the list of fields.<FIELD DISPLAYNAME>- The path of the field that contains the display name value for a given field. This is the path inside each object in the list of fields.- E.g. - If each object in the list of fields looks something like the following:
{
  "id": "234234",
  "displayValue": "Custom Field 99"
}
Then the
<FIELD UNIQUE IDENTIFER>would beid, and the<FIELD DISPLAYNAME>would bedisplayValue.- We can also access nested paths by using dot notation. E.g. - If the object looks like the following:
  {
    "field": {
      "id": "234234",
      "displayValue": "Custom Field 99"
    }
  }
Then the
<FIELD UNIQUE IDENTIFER>would befield.id, and the<FIELD DISPLAYNAME>would befield.displayValue.<RESPONSE PATH>- The path to access the list of objects from the response body. If the list of fields is returned as the entire response body, then leave this field blank (empty string). E.g. - If the request response looks like the following, then your response path would beticket_fields.
  {
    "ticket_fields": [
      {
        "url": "https://d3v.zendesk.com/api/v2/ticket_fields/30614797.json",
        "id": 30614797,
        "type": "subject",
        "title": "Subject",
        "raw_title": "Subject",
        "created_at": "2016-02-17T19:32:56Z",
        "updated_at": "2016-03-29T00:01:06Z"
      },
      {
        "url": "https://d3v.zendesk.com/api/v2/ticket_fields/30614807.json",
        "id": 30614807,
        "type": "description",
        "title": "Description",
        "raw_title": "Description",
        "created_at": "2016-02-17T19:32:56Z",
        "updated_at": "2016-03-28T17:41:50Z"
      }
    ]
  }
If the response looks like the following example, then leave the response path empty:
  [
    {
      "id": "customfield_10000",
      "key": "customfield_10000",
      "name": "Development",
      "custom": true,
      "clauseNames": [
        "cf[10000]",
        "development"
      ],
      "schema": {
        "type": "any",
        "customId": 10000
      }
    },
    {
      "id": "customfield_10001",
      "key": "customfield_10001",
      "name": "Organizations",
      "custom": true,
      "clauseNames": [
        "cf[10001]",
        "Organizations"
      ],
      "schema": {
        "type": "array",
        "customId": 10001
      }
    }
  ]
Run your metadata function, and ensure the output schema matches the example schema down below in the examples section.
Implement your newly created function as an input/output function call. Refer to the example section that demonstrates how to call a metadata function from the input/output section. Ultimately, instead of leveraging the
nameandtypeflags on the field definition, we will instead use themetadataflag, and the value will be the name of the function.
- First create the wrapper function by copying the wrapper function template that wraps the
- Feasibility - In order to leverage the template for dynamically generated I/O fields, it is required that the service’s API meets a few requirements.
Refer to an example of an action built using this template below.
Deployment
- Click the ‘Save’ button at the top left of the Forge toolbar.
- Saving a connector will save a draft. This will be overwritten with subsequent saves, and the draft does not have any version control. Be careful when saving.
- Wait for the ‘Connector successfully saved’ toast to appear, then you have saved successfully.
- Click the ‘Submit’ button at the top of the Forge toolbar.
- Increment the version by 1. For example, if the connector is currently version
1.2.7, then increment the version to1.2.8. Connector versioning uses basic semantic versioning rules. - Wait for the ‘Connector version submitted’ toast, then you have submitted successfully.
- Increment the version by 1. For example, if the connector is currently version
- Click on the ‘Control Panel’ tab at the top of Forge.
- Deploy your connector version that you have just submitted.
- Production Forge - Deploy using the ‘Testing Version’. Choose the (Test) connector in designer.
- Beta Forge - Deploy using the ‘Production Version’. Choose the standard connector (not Test) in beta Designer.
- Your updated connector should be available in designer.
- If you do not see your connector or action, please wait up to 20 minutes and check again. It may take some time to see them appear in designer once they have been deployed.
- If you do not see your connector or action, please wait up to 20 minutes and check again. It may take some time to see them appear in designer once they have been deployed.
Template and Examples
Template
Parameters
[
  {
    "<PARAMETER KEY NAME 1>": {
      "type": "string",
      "optional": true,
      "displayname": "<PARAMETER DISPLAYNAME 1>"
    }
  },
  {
    "<PARAMETER KEY NAME 2>": {
      "type": "option",
      "displayname": "<PARAMETER DISPLAYNAME 2>",
      "choices": [
        "<CHOICE VALUE 1>",
        "<CHOICE VALUE 2>",
        "<CHOICE VALUE 3>"
      ]
    }
  }
]
Inputs
{
  "extensible": false,
  "attributes": [
    {
      "name": "<INPUT FIELD HEADER NAME>",
      "attributes": [
        {
          "name": "<FIELD NAME 1>",
          "type": "string",
          "displayname": "<FIELD DISPLAYNAME 1>"
        },
        {
          "name": "<FIELD NAME 2>",
          "type": "object",
          "displayname": "<FIELD DISPLAYNAME 2>"
        },
        {
          "name": "<FIELD NAME 3>",
          "type": "object",
          "collection": true,
          "displayname": "<FIELD DISPLAYNAME 3>"
        },
        {
          "name": "<FIELD NAME 4>",
          "type": "number",
          "displayname": "<FIELD DISPLAYNAME 4>"
        },
        {
          "name": "<FIELD NAME 5>",
          "type": "boolean",
          "displayname": "<FIELD DISPLAYNAME 5>"
        }
      ]
    }
  ]
}
Outputs
{
  "extensible": false,
  "attributes": [
    {
      "name": "<OUTPUT FIELD HEADER NAME>",
      "attributes": [
        {
          "name": "<FIELD NAME 1>",
          "type": "string",
          "displayname": "<FIELD DISPLAYNAME 1>"
        },
        {
          "name": "<FIELD NAME 2>",
          "type": "object",
          "displayname": "<FIELD DISPLAYNAME 2>"
        },
        {
          "name": "<FIELD NAME 3>",
          "type": "object",
          "collection": true,
          "displayname": "<FIELD DISPLAYNAME 3>"
        },
        {
          "name": "<FIELD NAME 4>",
          "type": "number",
          "displayname": "<FIELD DISPLAYNAME 4>"
        },
        {
          "name": "<FIELD NAME 5>",
          "type": "boolean",
          "displayname": "<FIELD DISPLAYNAME 5>"
        }
      ]
    }
  ]
}
Core
Core Modules
Call Custom API Action
{
  "brick": "control.spawn",
  "id": "callCustomAPIAction",
  "item": "",
  "inputs": {
    "flo": {
      "_type": "flo",
      "_array": false,
      "_value": "customAPIAction"
    },
    "input": {
      "Request": {
        "Relative URL": "<RELATIVE URL>",
        "Body": "{{input.<INPUT FIELD HEADER NAME>}}"
      }
    },
    "parameters": {
      "requestType": "<REQUEST METHOD TYPE>"
    }
  },
  "outputs": {
    "output": {
      "_type": "object",
      "_array": false
    }
  }
}
Post Process
{
  "brick": "control.spawn",
  "id": "callPostProcess",
  "item": "",
  "inputs": {
    "flo": {
      "_type": "flo",
      "_array": false,
      "_value": "<POST PROCESS FUNCTION NAME>"
    },
    "input": "{{callCustomAPIAction.output}}"
  },
  "outputs": {
    "output": {
      "_type": "object",
      "_array": false
    }
  }
}
Metadata Function(s)
Post Process function
[
  {
    "brick": "object.construct",
    "id": "output",
    "inputs": {
      "<OUTPUT FIELD HEADER NAME>": {
        "<FIELD NAME 1>": "{{input.Response.Body.<FIELD NAME 1>}}",
        "<FIELD NAME 2>": "{{input.Response.Body.<FIELD NAME 2>}}",
        "<FIELD NAME 3>": "{{input.Response.Body.<FIELD NAME 3>}}",
        "<FIELD NAME 4>": "{{input.Response.Body.<FIELD NAME 4>}}",
        "<FIELD NAME 5>": "{{input.Response.Body.<FIELD NAME 5>}}"
      }
    },
    "outputs": {
      "output": {
        "_type": "object",
        "_array": false
      }
    }
  }
]
Dynamic Inputs/Outputs (Advanced)
Input/Output schema template for dynamic I/O
- Single Field Header
{
  "extensible": false,
  "attributes": [
    {
      "name": "<FIELD HEADER NAME>",
      "attributes": [
        {
          "metadata": "<CUSTOM FIELD WRAPPER FUNCTION NAME>"
        }
      ]
    }
  ]
}- Multiple Field Headers with Static Fields
{
  "extensible": false,
  "attributes": [
    {
      "name": "<STATIC FIELD HEADER NAME>",
      "attributes": [
        {
          "name": "<STATIC FIELD 1 NAME>",
          "type": "string"
        },
        {
          "name": "<STATIC FIELD 2 NAME>",
          "type": "string"
        }
      ]
    },
    {
      "name": "<CUSTOM FIELD HEADER NAME>",
      "attributes": [
        {
          "metadata": "<CUSTOM FIELD WRAPPER FUNCTION NAME>"
        }
      ]
    }
  ]
}
Wrapper function around dynamicIo function.
{
  "name": "<CUSTOM FIELD WRAPPER FUNCTION NAME>",
  "description": "A wrapper function around dynamicIo, which will generate the schema required to render input/output fields",
  "kind": "metadata",
  "zebricks": [
    {
      "brick": "control.spawn",
      "id": "getFields",
      "item": "",
      "inputs": {
        "flo": {
          "_type": "flo",
          "_array": false,
          "_value": "dynamicIo"
        },
        "input": {
          "Method": "<REQUEST METHOD TYPE>",
          "Relative URL": "<REQUEST RELATIVE URL>",
          "Headers": {<REQUEST HEADERS>},
          "Body": {<REQUEST BODY>},
          "Fields": {
            "name": "<FIELD UNIQUE IDENTIFER>",
            "displayName": "<FIELD DISPLAYNAME>"
          },
          "Response Path": "<RESPONSE PATH>"
        }
      },
      "outputs": {
        "output": {
          "_type": "object",
          "_array": true
        }
      }
    }
  ],
  "displayname": "<CUSTOM FIELD WRAPPER FUNCTION NAME>"
}
Examples
Example Action Modules
Parameters
[
  {
    "requestType": {
      "type": "option",
      "displayname": "Request Type",
      "choices": [
        "GET",
        "POST",
        "PUT",
        "PATCH",
        "DELETE"
      ]
    }
  }
]
Example rendering of parameters in designer:
Inputs
{
  "extensible": false,
  "attributes": [
    {
      "name": "Fields",
      "attributes": [
        {
          "name": "name",
          "type": "string",
          "displayname": "Name"
        },
        {
          "name": "description",
          "type": "string",
          "displayname": "Description"
        },
        {
          "name": "campaignCode",
          "type": "string",
          "displayname": "Campaign Code"
        },
        {
          "name": "color",
          "type": "string",
          "displayname": "Color"
        },
        {
          "name": "favorite",
          "type": "boolean",
          "displayname": "Favorite"
        }
      ]
    }
  ]
}
Outputs
{
"extensible": false,
"attributes": [
{
"name": "New Record",
"attributes": [
{
"name": "id",
"type": "string",
"displayname": "ID"
},
{
"name": "name",
"type": "string",
"displayname": "Name"
},
{
"name": "description",
"type": "string",
"displayname": "Description"
},
{
"name": "campaignCode",
"type": "string",
"displayname": "Campaign Code"
},
{
"name": "color",
"type": "string",
"displayname": "Color"
},
{
"name": "favorite",
"type": "boolean",
"displayname": "Favorite"
},
{
"name": "createdDate",
"type": "string",
"displayname": "Created Date"
},
{
"name": "modifiedDate",
"type": "string",
"displayname": "Modified Date"
}
]
}
]
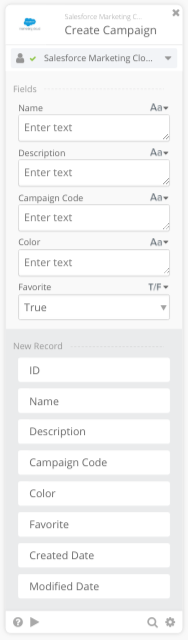
}Example Input & Output fields in designer using the above I/O schemas:
Core
{
  "brick": "control.spawn",
  "id": "createCampaign",
  "item": "",
  "inputs": {
    "flo": {
      "_type": "flo",
      "_array": false,
      "_value": "customAPIAction"
    },
    "input": {
      "Request": {
        "Relative URL": "/hub/v1/campaigns",
        "Body": "{{input.Fields}}"
      }
    },
    "parameters": {
      "requestType": "POST"
    }
  },
  "outputs": {
    "output": {
      "_type": "object",
      "_array": false
    }
  }
}
{
"brick": "control.spawn",
"id": "postProcess",
"item": "",
"inputs": {
"flo": {
"_type": "flo",
"_array": false,
"_value": "createCampaignPostProcess"
},
"input": "{{createCampaign.output}}"
},
"outputs": {
"output": {
"_type": "object",
"_array": false
}
}
}Post-Process Function
{
"name": "createCampaignPostProcess",
"description": "Post processing function for create campaign",
"kind": "metadata",
"zebricks": [
{
"brick": "object.construct",
"id": "output",
"inputs": {
"New Record": {
"id": "{{input.Response.Body.id}}",
"name": "{{input.Response.Body.name}}",
"description": "{{input.Response.Body.description}}",
"campaignCode": "{{input.Response.Body.campaignCode}}",
"color": "{{input.Response.Body.color}}",
"favorite": "{{input.Response.Body.favorite}}",
"createdDate": "{{input.Response.Body.createdDate}}",
"modifiedDate": "{{input.Response.Body.modifiedDate}}"
}
},
"outputs": {
"output": {
"_type": "object",
"_array": false
}
}
}
],
"displayname": "createCampaignPostProcess"
}Dynamic I/O Examples (Advanced)
Jira example
- I/O Definition
{
"extensible": false,
"attributes": [
{
"name": "Fields",
"attributes": [
{
"metadata": "customFieldsWrapper"
}
]
}
]
}- Wrapper Function
{
"name": "customFieldsWrapper",
"description": "A wrapper function around dynamicIo, which will generate the schema required to render input/output fields",
"kind": "metadata",
"zebricks": [
{
"brick": "control.spawn",
"id": "AvgGe",
"item": "",
"inputs": {
"flo": {
"_type": "flo",
"_array": false,
"_value": "dynamicIo"
},
"input": {
"Method": "GET",
"Relative URL": "/rest/api/2/field",
"Headers": {},
"Body": {},
"Fields": {
"name": "key",
"displayName": "name"
},
"Response Path": ""
}
},
"outputs": {
"output": {
"_type": "object",
"_array": true
}
}
}
],
"displayname": "customFieldsWrapper"
}- Wrapper Function Output example (using the response body from the example from step 8 in the Walkthrough):
[
{
"name": "customfield_10000",
"type": "string",
"available": [
"string",
"object",
"number",
"boolean"
],
"displayname": "Development"
},
{
"name": "customfield_10001",
"type": "string",
"available": [
"string",
"object",
"number",
"boolean"
],
"displayname": "Organizations"
}
]Zendesk Example
- I/O Definiton
{
"extensible": false,
"attributes": [
{
"name": "Ticket",
"attributes": [
{
"name": "Ticket URL",
"type": "string"
},
{
"name": "Subject",
"type": "string"
}
]
},
{
"name": "Custom Fields",
"attributes": [
{
"metadata": "customFieldsWrapperTickets"
}
]
}
]
}- Wrapper Function
{
"name": "customFieldsWrapperTickets",
"description": "A wrapper function around dynamicIo, which will generate the schema required to render input/output fields",
"kind": "metadata",
"zebricks": [
{
"brick": "control.spawn",
"id": "AvgGe",
"item": "",
"inputs": {
"flo": {
"_type": "flo",
"_array": false,
"_value": "dynamicIo"
},
"input": {
"Method": "GET",
"Relative URL": "/api/v2/ticket_fields.json",
"Headers": {},
"Body": {},
"Fields": {
"name": "raw_title",
"displayName": "title"
},
"Response Path": "ticket_fields"
}
},
"outputs": {
"output": {
"_type": "object",
"_array": true
}
}
}
],
"displayname": "customFieldsWrapperTickets"
}- Wrapper Function Output example (using the response body from the example from step 8 in the Walkthrough steps):
[
{
"name": "Subject",
"type": "string",
"available": [
"string",
"object",
"number",
"boolean"
],
"displayname": "Subject"
},
{
"name": "Description",
"type": "string",
"available": [
"string",
"object",
"number",
"boolean"
],
"displayname": "Description"
}
]Example Action (combined components)
Note: Metadata functions are called from the action, and are not explicitly a function of the action itself.
{
"name": "createCampaign",
"displayname": "Create Campaign",
"description": "Create a Campaign in Salesforce Marketing Campaign.",
"kind": "action",
"params": [],
"input": {
"extensible": false,
"attributes": [
{
"name": "Fields",
"attributes": [
{
"name": "name",
"type": "string",
"displayname": "Name"
},
{
"name": "description",
"type": "string",
"displayname": "Description"
},
{
"name": "campaignCode",
"type": "string",
"displayname": "Campaign Code"
},
{
"name": "color",
"type": "string",
"displayname": "Color"
},
{
"name": "favorite",
"type": "boolean",
"displayname": "Favorite"
}
]
},
{
"name": "Custom Fields",
"attributes": [
{
"metadata": "customFieldsWrapper"
}
]
}
]
},
"output": {
"extensible": false,
"attributes": [
{
"name": "New Record",
"attributes": [
{
"name": "id",
"type": "string",
"displayname": "ID"
},
{
"name": "name",
"type": "string",
"displayname": "Name"
},
{
"name": "description",
"type": "string",
"displayname": "Description"
},
{
"name": "campaignCode",
"type": "string",
"displayname": "Campaign Code"
},
{
"name": "color",
"type": "string",
"displayname": "Color"
},
{
"name": "favorite",
"type": "boolean",
"displayname": "Favorite"
},
{
"name": "createdDate",
"type": "string",
"displayname": "Created Date"
},
{
"name": "modifiedDate",
"type": "string",
"displayname": "Modified Date"
}
]
},
{
"name": "Custom Fields",
"attributes": [
{
"metadata": "customFieldsWrapperTickets"
}
]
}
]
},
"zebricks": [
{
"brick": "control.spawn",
"id": "createCampaign",
"item": "",
"inputs": {
"flo": {
"_type": "flo",
"_array": false,
"_value": "customAPIAction"
},
"input": {
"Request": {
"Relative URL": "/hub/v1/campaigns",
"Body": "{{input.Fields}}"
}
},
"parameters": {
"requestType": "POST"
}
},
"outputs": {
"output": {
"_type": "object",
"_array": false
}
}
},
{
  "brick": "control.spawn",
  "id": "postProcess",
  "item": "",
  "inputs": {
    "flo": {
      "_type": "flo",
      "_array": false,
      "_value": "createCampaignPostProcess"
    },
    "input": "{{createCampaign.output}}"
  },
  "outputs": {
    "output": {
      "_type": "object",
      "_array": false
    }
  }
}
]
}